Cygnus - Powerfull website designing tool
By Radiuzz.com
Thank you
I would like to say thank you for choosing Cygnus theme. In this documentation you will find everything you need to use this theme. If you have any questions which are not covered in this documentation, please, create a ticket
About Cygnus theme
Cygnus is an ultimate and extra customizable wordpress theme, that helps to create excellent websites without spending significant amount of time and efforts. Its user-friendly interface, modern and nifty design, much more additional tools and features make Cygnus useful, customizable and straightforward. Easy installation, demo export and setup – all you need to build good website. A lot of useful plugins, interactivity, numerous modules for different purposes, fast and helpful support makes Cygnus very necessary thing for any kind of website.
Images included in theme
NB! All the images presented in the Cygnus Theme are for the familiarization only and are not allowed for personal or commercial usage. You may buy them on Shutterstock to use for your purposes.
Installing WordPress
WordPress is well-known for its ease of installation. Under most circumstances installing WordPress is a very simple process and takes less than five minutes to complete. Many web hosts now offer tools (e.g. Bluehost, mediatemple) to automatically install WordPress for you. However, if you wish to install WordPress yourself, click below button to read about Famous 5 Minute Installation.
5 Minute Installation GuideAlternatively you may be interested on below topics:
- Things to Know Before You Begin Installing WordPress
- The Famous 5-Minute Installation
- Detailed Installation Instructions
- Common Installation Problems
- WordPress in Your Language
- Installing WordPress in Your Language
- How to Install Multiple Blogs
- How to Install on Your Own Computer
- Easy 5 Minute WordPress Installation on Windows
- How to Install with Amazon's Web Services (AWS)
- Getting Started with WordPress (much more installation info)
Disclaimer
Please note that we do not give support or any questions related on how to install and maintain wordpress. For any faulty installation that may cause your website or our theme malfunction you should refer to wordpress support forum. Alternatively you can get help from your web hosting.
Download Package from Theme Forest
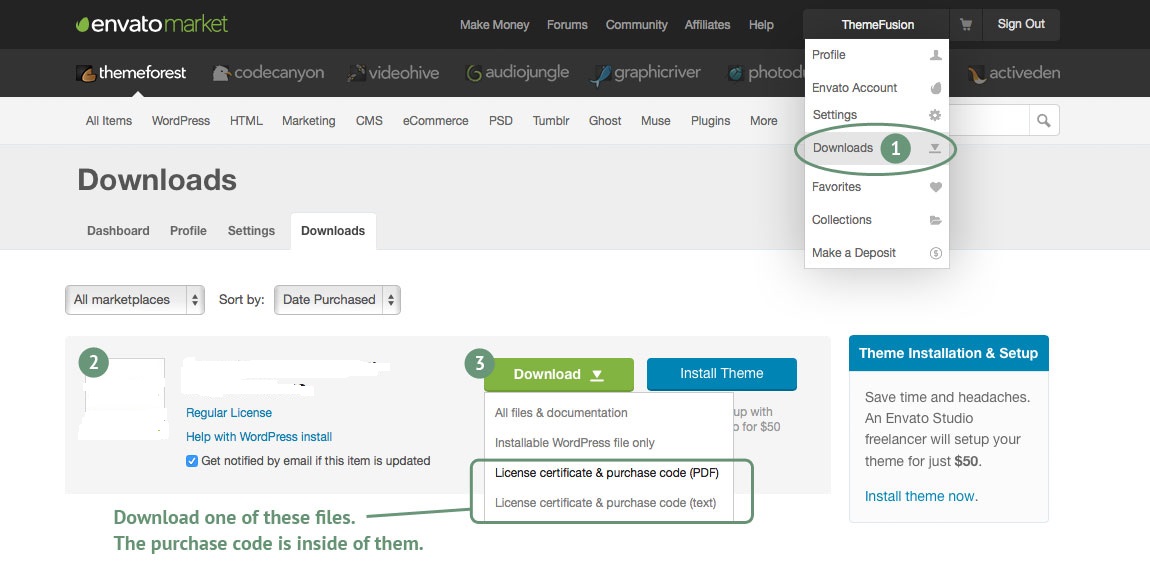
Step 1 – Login to your ThemeForest account and navigate to your ‘Downloads’ tab and then locate your Cygnus theme purchase.
Step 2 – Click the ‘Download’ button and choose to either download the ‘Installable WordPress file only’, which is just the WordPress installable file, or choose to download ‘All Files & Documentation’ where you will find everything included in theme package.
Step 3 – For instructions on how to install the theme via WordPress, click Theme Installation.
Theme Installation
Once you download Cygnus Theme, unzip the main item. you will see the following folders:
- Theme
- Theme files that you will need to upload them into your wordpress themes directory
- Documentation
- Includes theme documentation for Cygnus theme.
- Licensing
- Lisence for theme and other items used on theme
Cygnus can be installed in two different ways:
- Installing through wordpress
- Uploading through FTP (File transfer protocol)
Installation through Wordpress:
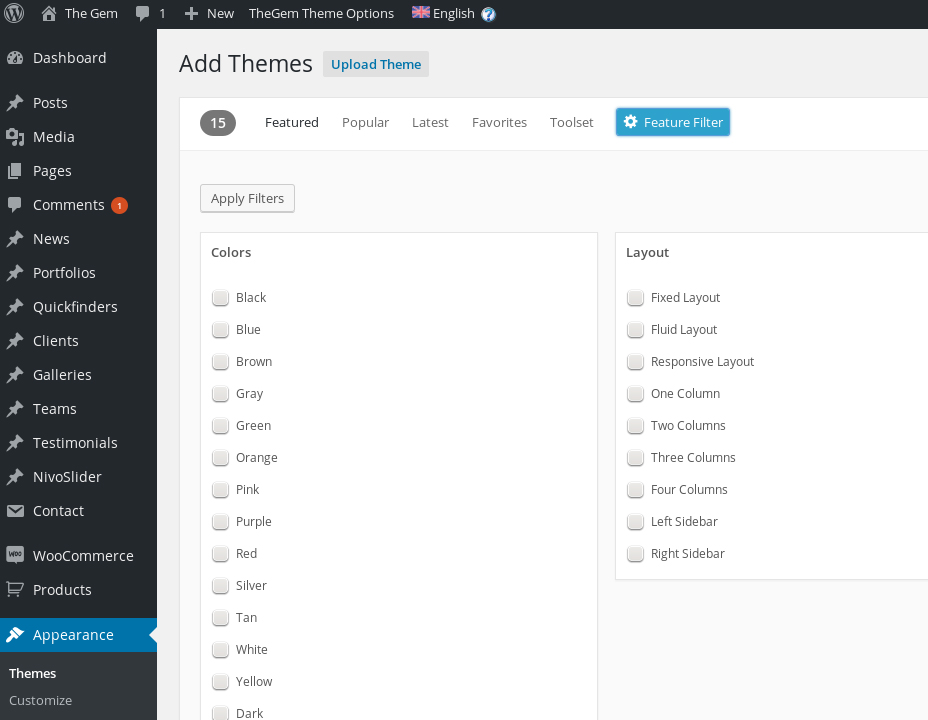
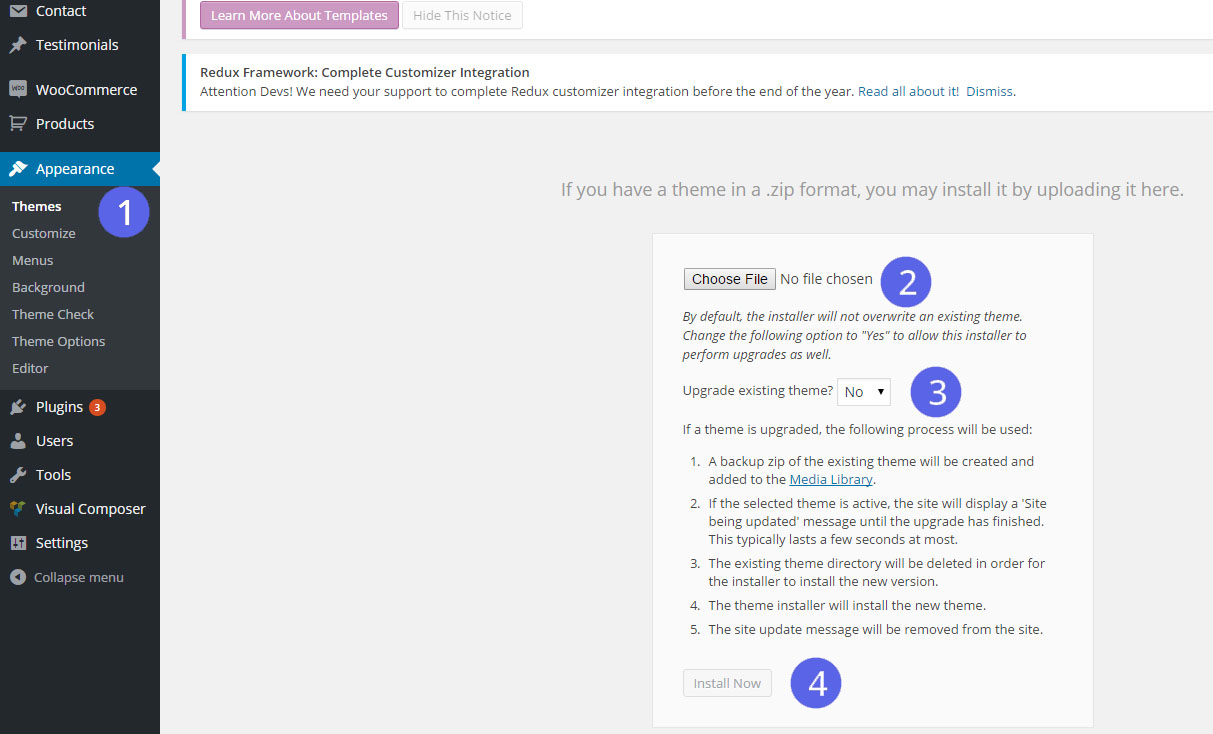
- Step 1 - Open Appearance → Themes
- Step 2 - Click “Add New Theme” and hit upload link
- Step 3 - Find the the file Cygnus.zip” on your hdd and hit install now button
- Step 4 - After the theme is installed click on “Activate”
- Step 5 – Once activated, You’ll see a prompt to install Cygnus’s required plugins, please follow instruction and install all necessary plugins
Warning!
While installing your theme through wordpress admin, you may encounter an error message saying “are sure you want to do this?”. This is mainly due to your hosting php settings. Cygnus theme zip file is roughly around 6mb and in some hostings the default value for max_upload_limit left default which is 2mb. To solve this problem you should either increase your maximum upload size (to 10mb) on your hosting admin panel or ask your host to do it for you if you do not have the privilege to alter your server php settings. This is a very common request and they should be able to help you out. Once the limit is increased you can re-try the install and you’ll be all good to go.
Installation Through FTP
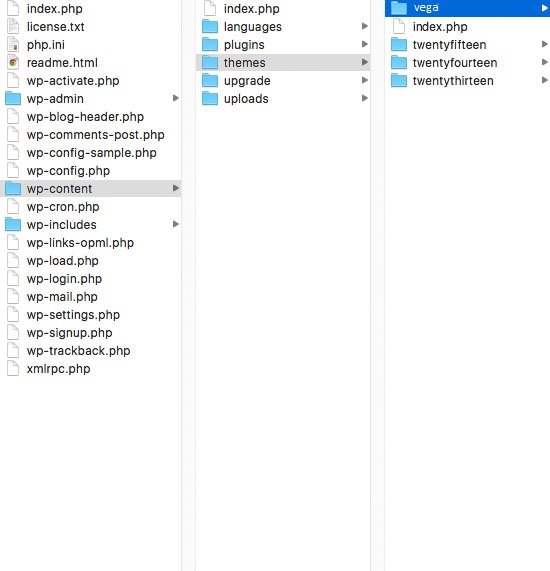
Step 1 – Log into your server installation via FTP. You can use software such as Filezilla for this.
Step 2 – If you have downloaded the Full Theme Package from ThemeForest, please unzip the master Cygnus.zip file and then unzip the secondary Cygnus.zip file which will give an Cygnus folder.
Step 3 – Upload the extracted Cygnus folder to the wp-content > themes folder on the server. Make sure the folder name is -> ‘Avada’.
Step 4 – Log in to your WordPress Dashboard and navigate to Appearance > Themes and clicking the ‘Activate’ button, for the Cygnus theme.
Step 5 – Once activated, You’ll see a prompt to install Avada’s required plugins, please follow instruction and install all necessary plugins
Importing Demo Content
Below explanation is an step by step explanation on how to import our demo website content, please read carefully and if you face any problems that is not covered here, open a thread in our support forum.
- Login into your WordPress Admin section (http://www.your-web-site.com/wp-admin)
- Go to Appearance -> Import demo data
- Click on the WordPress and follow the instructions if Import plugin isn’t installed yet (3.0+).
- Click on "Import" button.
- please note none of the images will be downloaded because of copyright restrictions. You will need to add your images manually.
- WordPress will then import each of the posts, page, custom post types, comments, and categories contained in this file into your blog.
- On the last step you have to import sliders, go ahead open slider revolution, import and choose slider one by one and import them all
- Done! You should now have the dummy/demo content similar from the Live Preview of the theme.
Increasing the WordPress Memory Limit
- Edit your wp-config.php file and enter something like:
define('WP_MEMORY_LIMIT', '96M');Note
Please note that WordPress memory can be different to the server – you need to set this regardless of server memory settings - If you have access to your PHP.ini file, change the line in PHP.ini
If your line shows 32M try 64M:
memory_limit = 64M ; Maximum amount of memory a script may consume (64MB)
- If you don’t have access to PHP.ini try adding this to an .htaccess file:
php_value memory_limit 64M
- If none of the above works then talk to your host.
Updating Wordpress Theme
There are 3 methods to update my wordpress themes to newer version. These new updates are essential if you want to have a bugfree website as we give new features and improvements to the theme over time. some of these updates might be needed in order to make the theme compatible with wordpress newer versions. there is no risk on losing your settings and pages. However if you had done modifictations on theme files, then they will be lost.
Method 1 - Manual update
- Login into your Themeforest account and go to downloads (Dashboad > downloads)
- Download the theme into your computer
- Install an FTP program (Filezilla is free)
- Retrieve your FTP login information from your hosting admin panel and login into your hosting via FTP
- Unzip the item main file
- Locate theme.zip (eg : Cygnus.zip) and unzip it. make sure your unzipping software do not create extra directory with the same name nested into each other.
- drag and drop theme main folder into your FTP program with the destination : "YOUR_HOSTING_ROOT/YOUR_SUBDIRECTORY/wp-content/themes/"
- FTP program will give a warning that there is an existing with the same directory name, choose replace all.
- Then you are ready to Go !
Method 2 - Update Through Wordpress Admin Panel
- For this method you should first install Theme Upgrades Tool
- Unzip the file you just downloaded from ThemeForest and locate the WordPress Theme. (eg. Cygnus.zip)
- Log into your WordPress Dashboard.
- Click on “Appearance > Themes”.
- Still within the Themes section, on header tab, click on “Install Themes”, then on header second tab click "Upload".
- Click “Browse…” and locate the new theme file. (eg. Cygnus.zip)
- In the “Upgrade existing theme?” option choose “Yes” from the dropdown list.
- Click “Install Now”.
- Click “Activate”.
Cygnus Option Settings
Theme Option settings is the core of your theme. A place you can customise from A-Z. Its in fact theme settings same like other themes, however we put alot of time and effort to build a solid framework. It exhibits options and settings in a way you can find them easily, and many other features. We are not going to explain every single option in option tree since we added description for each option and most of them are self descriptive.
In this documentation we will cover some major sections that has a workflow and needed to be explained in steps to avoid any confusion.
Pls note: in order to ensure the correct working of theme options (saving your style changes) all caching plugins you may be using on your website should be better deactivated. After you are done with your changes you can activate this caching plugins again.
Before we move on to other sections let us introduce some geneal stuff here :
- Aways click on “Save changes” in order to make your settings take effect
- You can always make a backup and/or restore your settings by using “Backup” option in admin panel. So you can freely experiment with all of TheGem options without having fear to loose some of them
- Your Theme Version indicator at top left side with theme name. so you can always see what version you are using.
- Save changes that will save ALL changes you have made in theme option, only the pane you are currently viewing.
- Reset section will return all settings to default state on current pane only.
- Reset all will return all settings to default state on all panes.
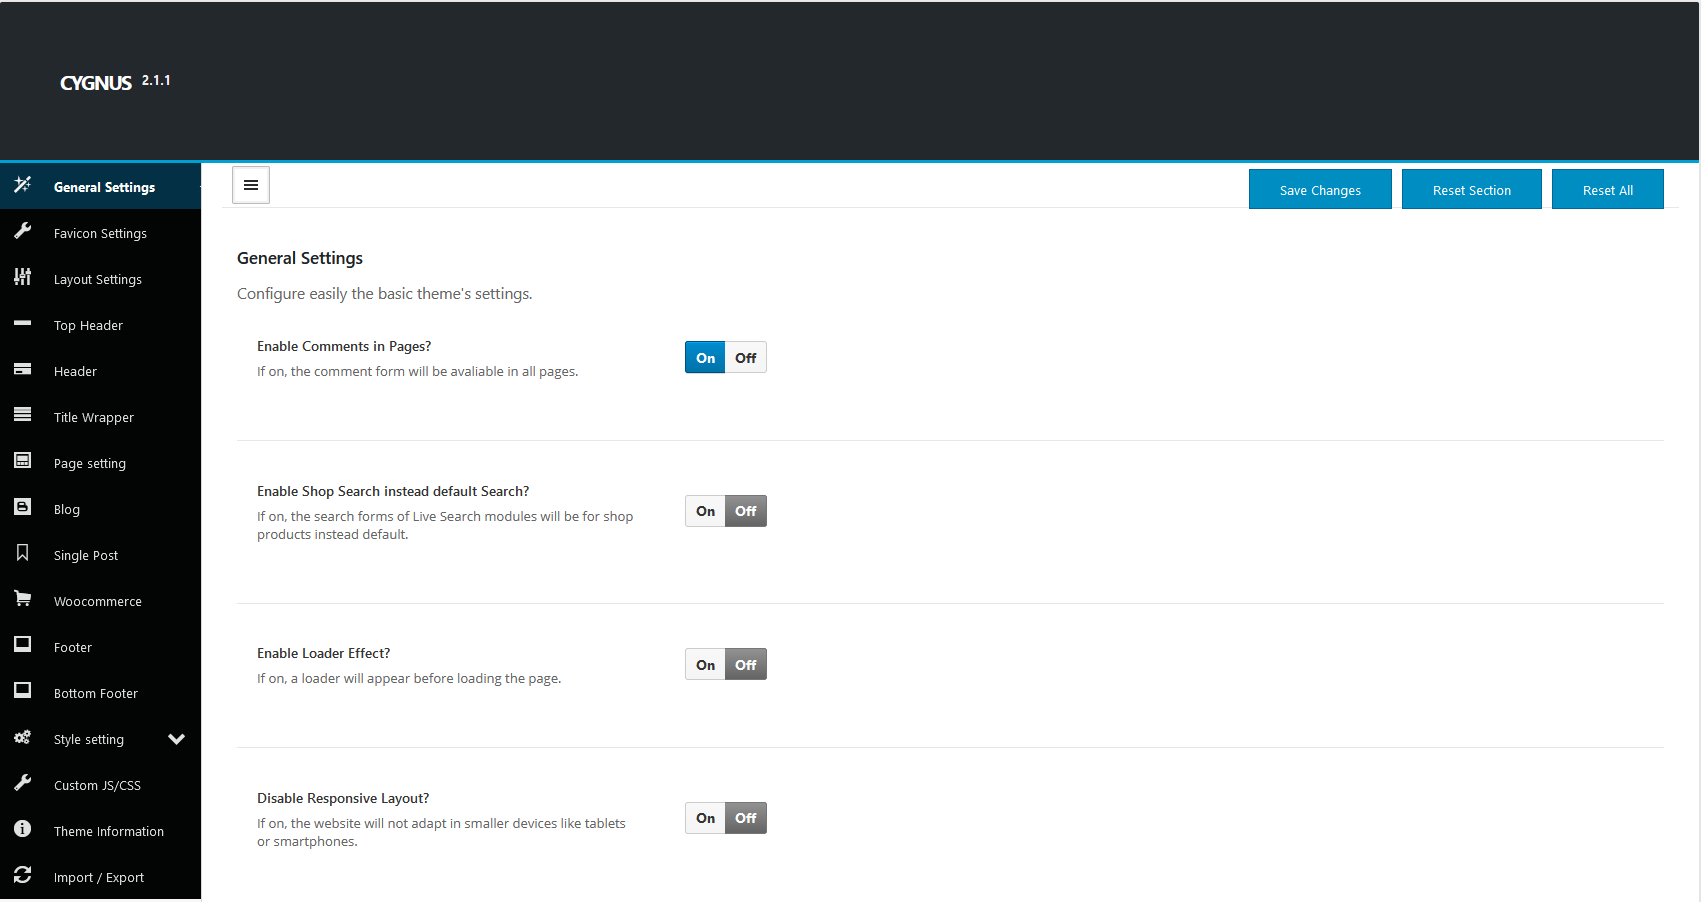
General Settings
Uploading Your Logo
In Cygnus theme inorder to update the logo, you need to navigate to Theme Option > Header, there you will find Custom Logo option which accpets logo.
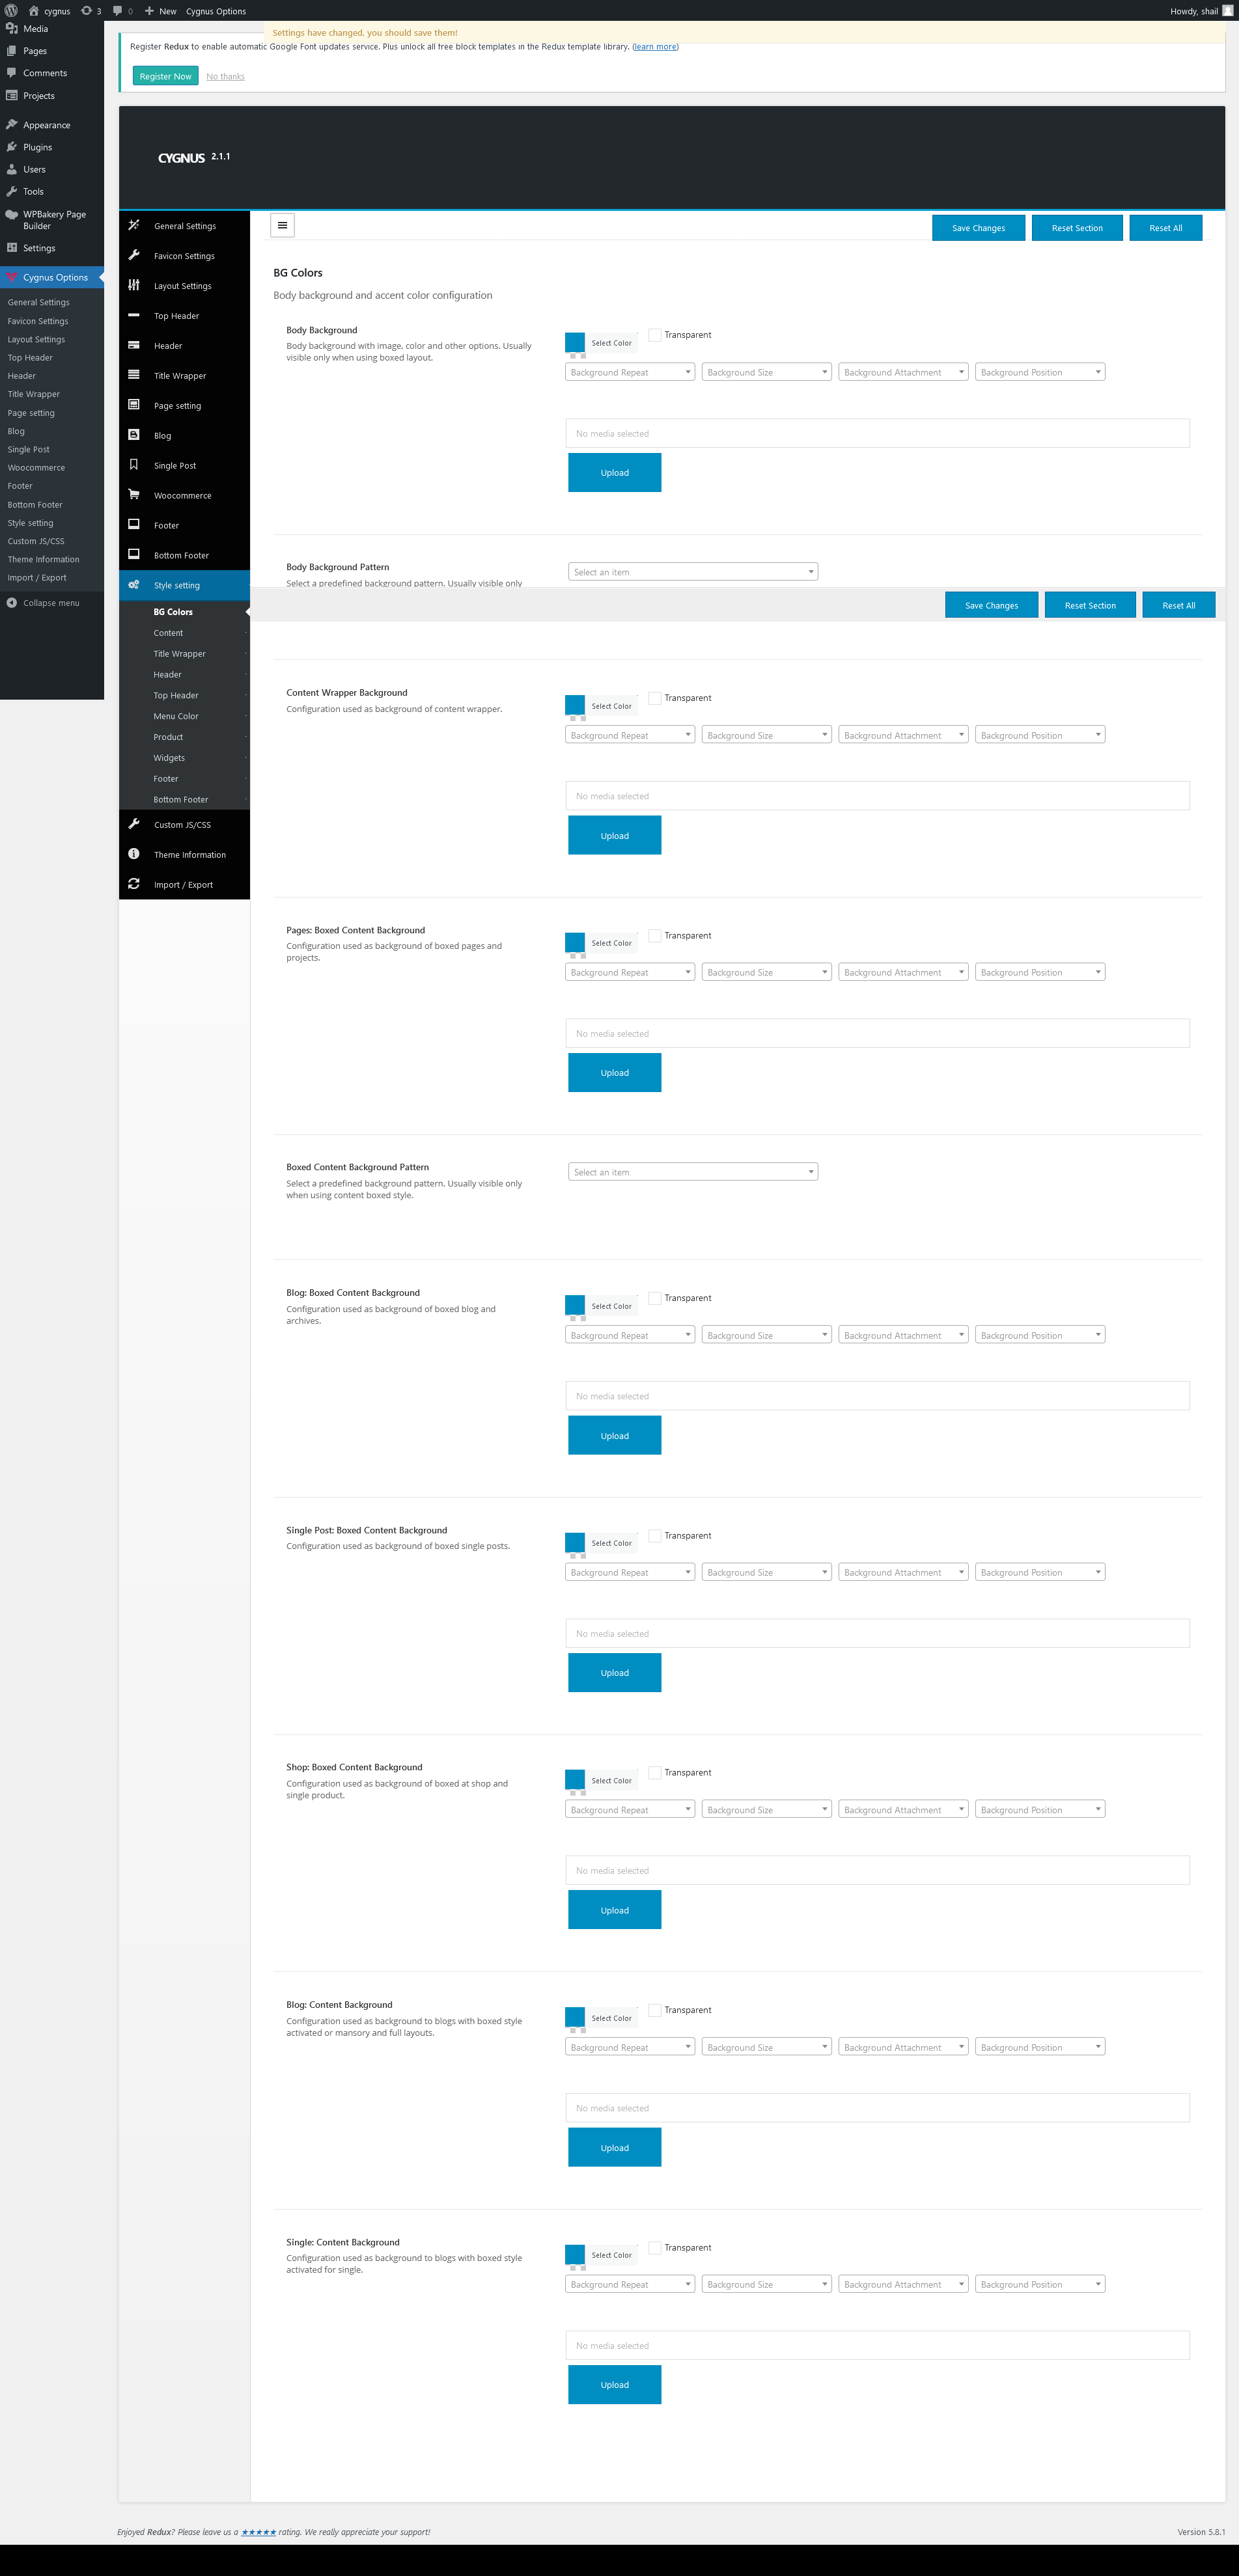
Styling & Coloring
Here is where all the magic happens! Here you can customize your websites backgrounds, header, footer, typography and many more. In Option settings click on Customizer from left hand main navigation.
- Customizer :The only advanced and easy to use background selector we have seen so far! We dont even see a need to explain how to work with that. you just play around with it and everything will come naturally. you will not cunfused or overwhelmed. This section introduces element's color for your theme such as loader color, page title background color, menu color, menu link color and so on, also this section introduces you to how to change the font typography, sizes, weight, line height and so on. It's pretty self explaintory.
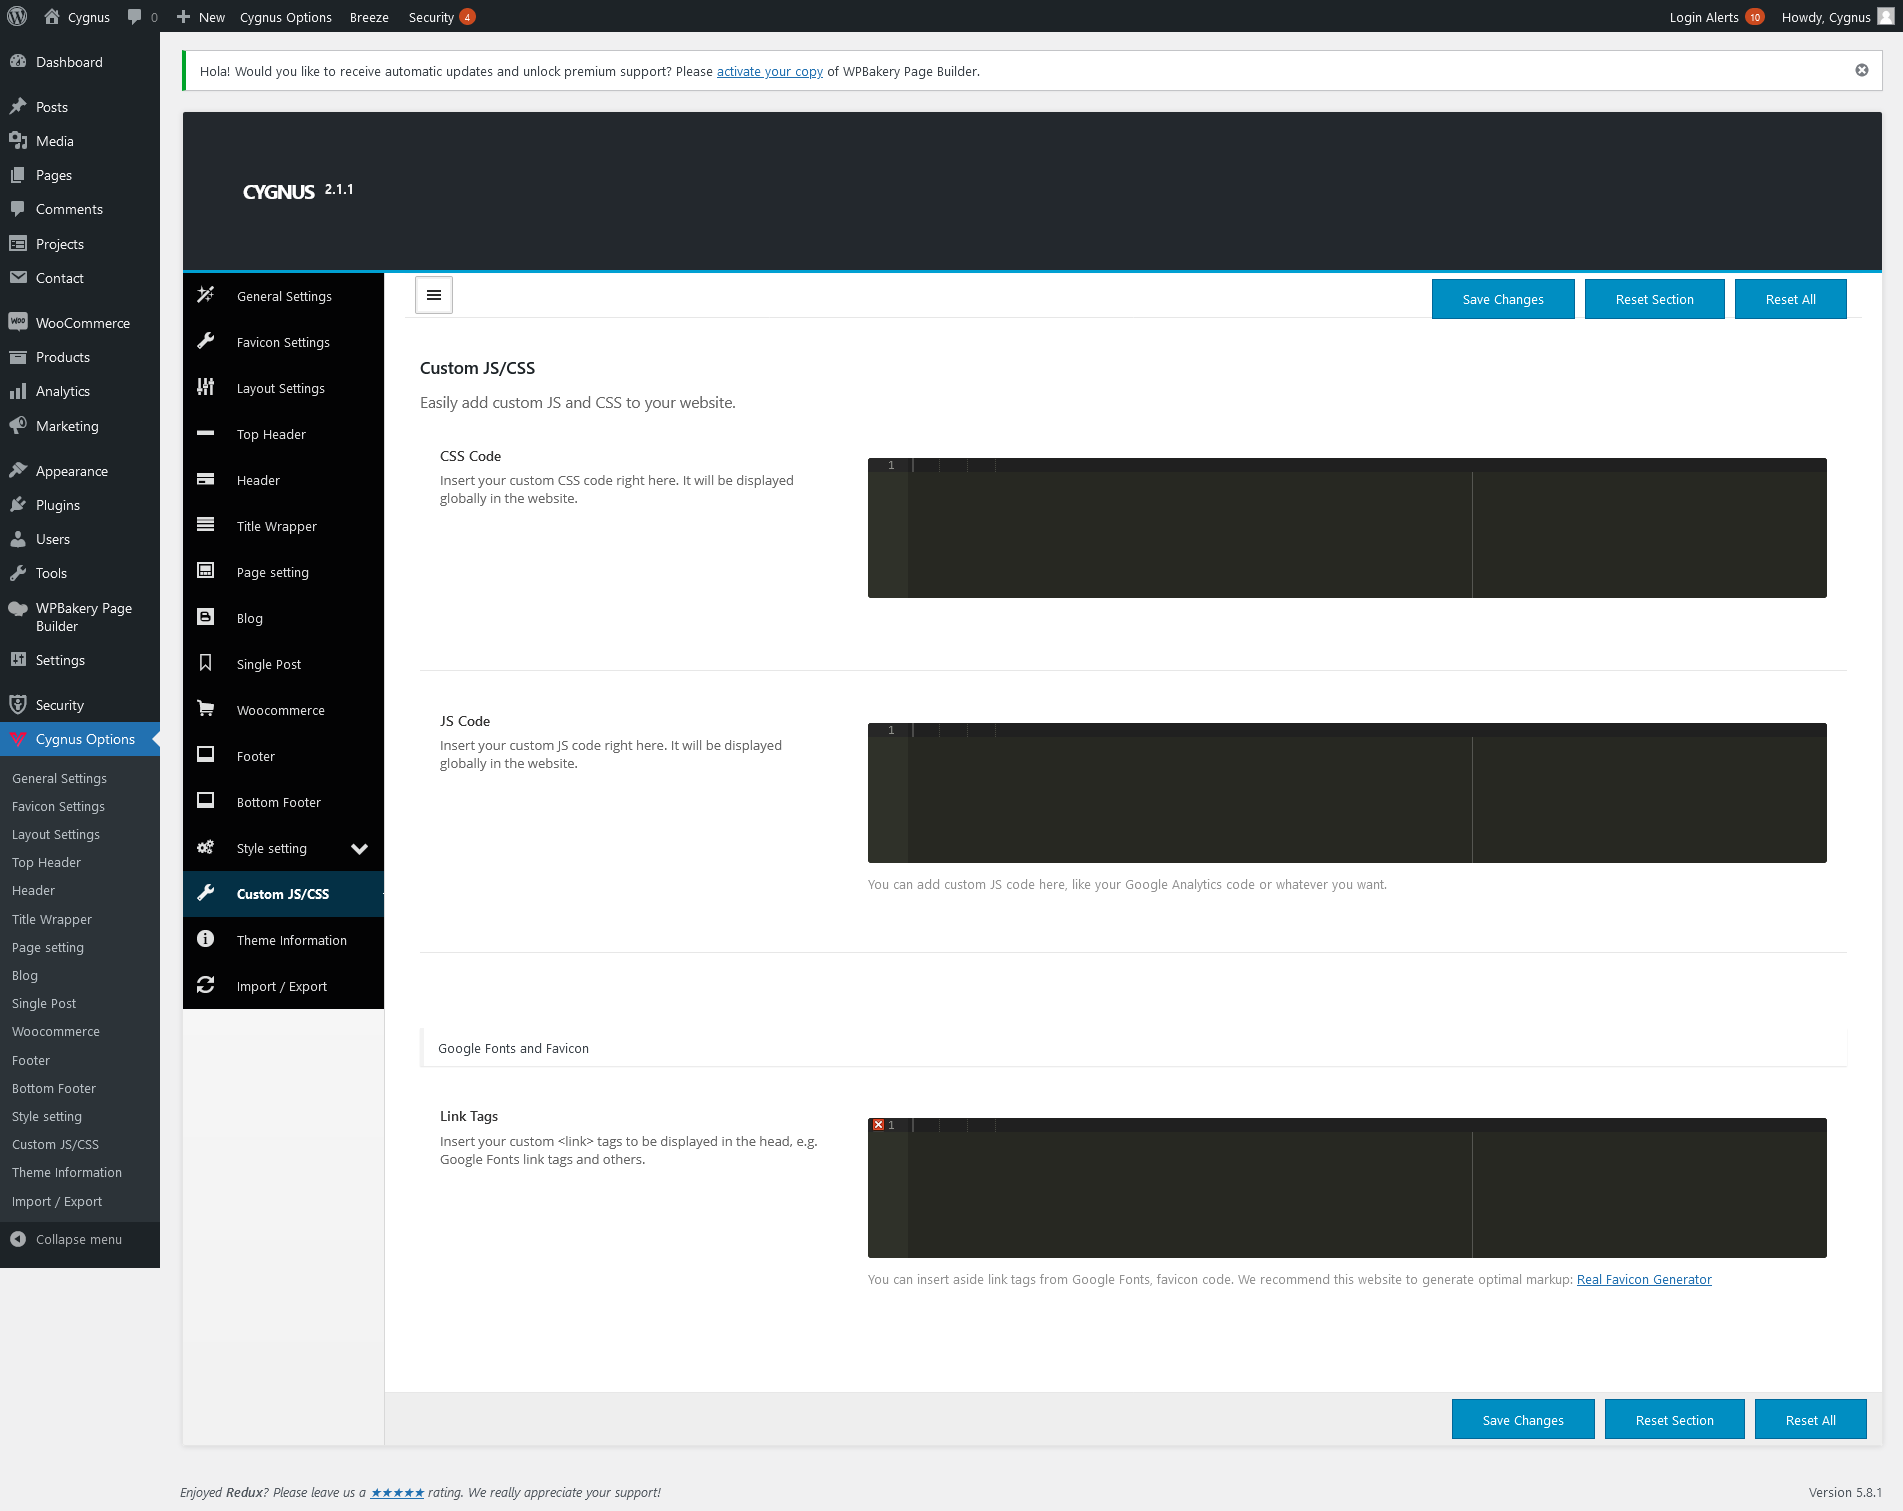
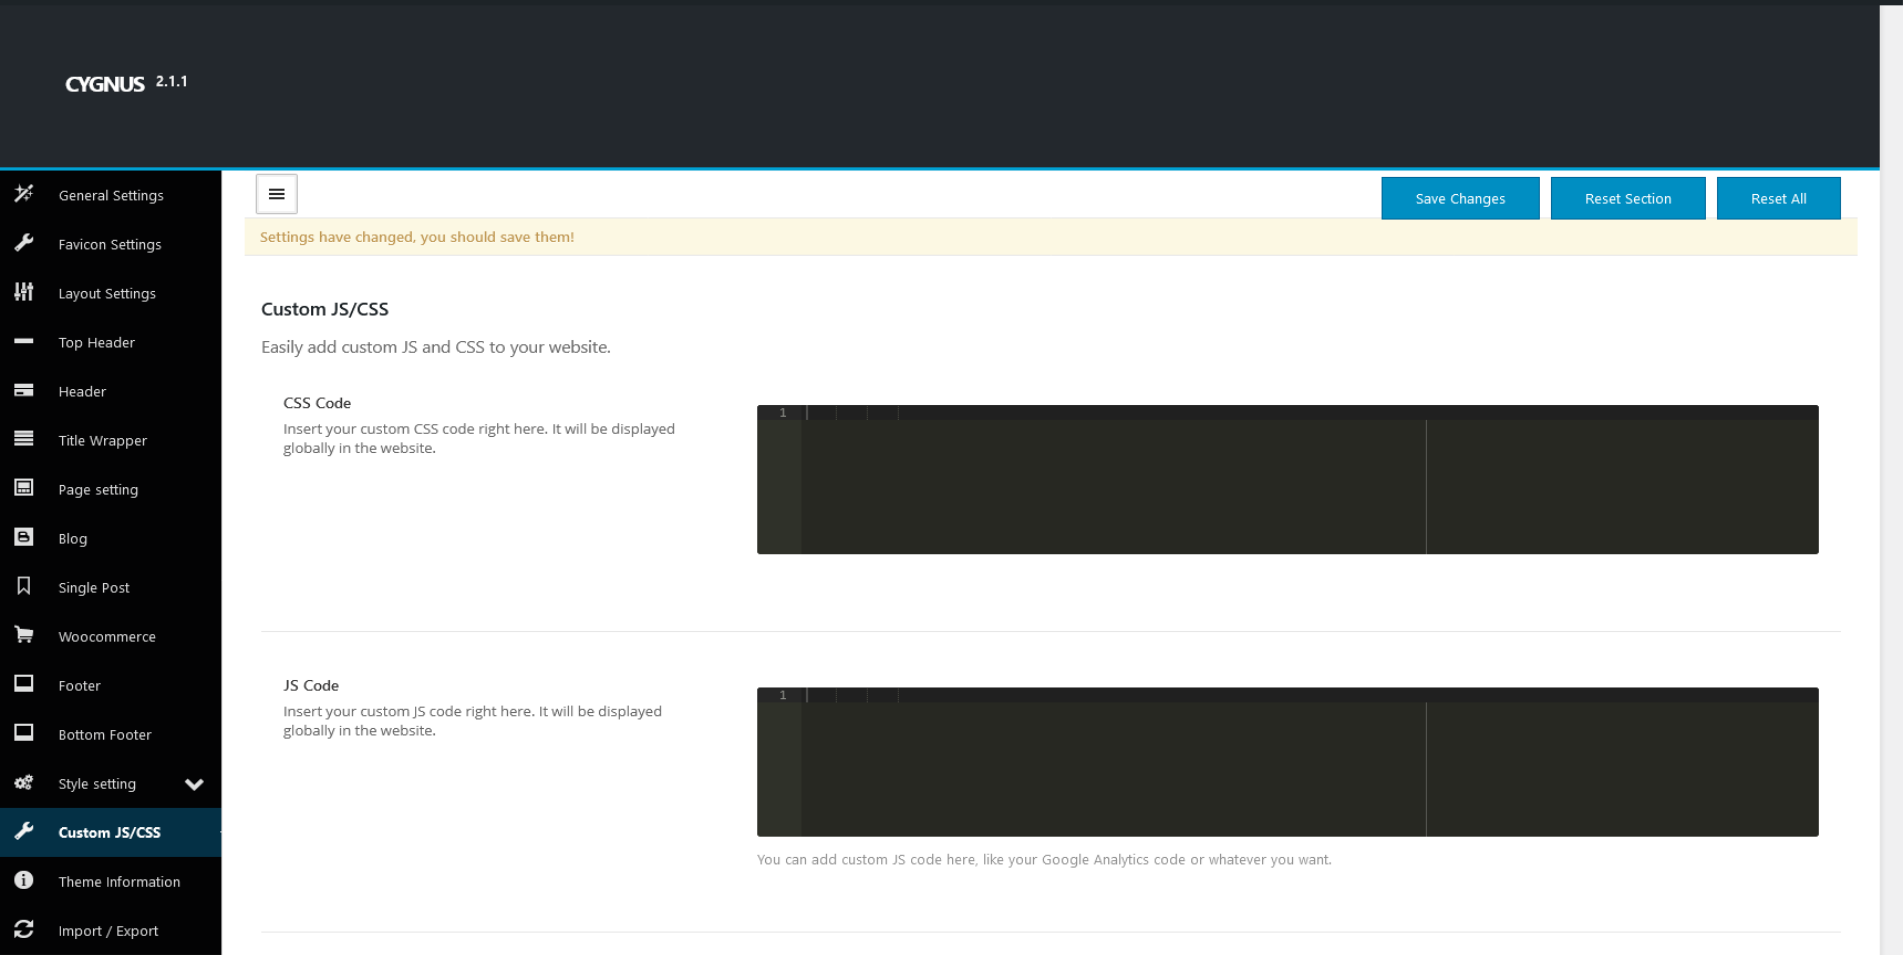
Custom CSS & JS
If you need to apply some small CSS tweaks, then you are in right place. Please note that you should always have a copy of your custom codes as sometimes you may mistakenly reset theme options to defaults and lose all your custom css. Alternatively you may consider maCygnus a child theme if your customisation is beyund just few lines of css. below are some links to how to create your own child theme :
- Child Themes « WordPress Codex
- Child Themes Basics and Creating Child Themes in WordPress
- WordPress child theme made easy… and easier
Export & Import Options
If you have decided to move your wordpress installation to other hosting, Export & Import feature will help you do this migration painlessly. Please note this feature will help you to only migrate Masterkey settings (skinning, typography, etc).
- Go to Theme Option > Export/Import options
- There's two option, either you can import theme option via file or url, please choose any one of that option.
- Click on "Import" button
- Done! you will see immediately see the changes in frontend.
Page Option Settings
In Cygnus theme there are numerious page metabox settings, some of them are listed below :
- Layout Setting
- Preheader
- Header
- Title Wrapper
- Content
- Footer
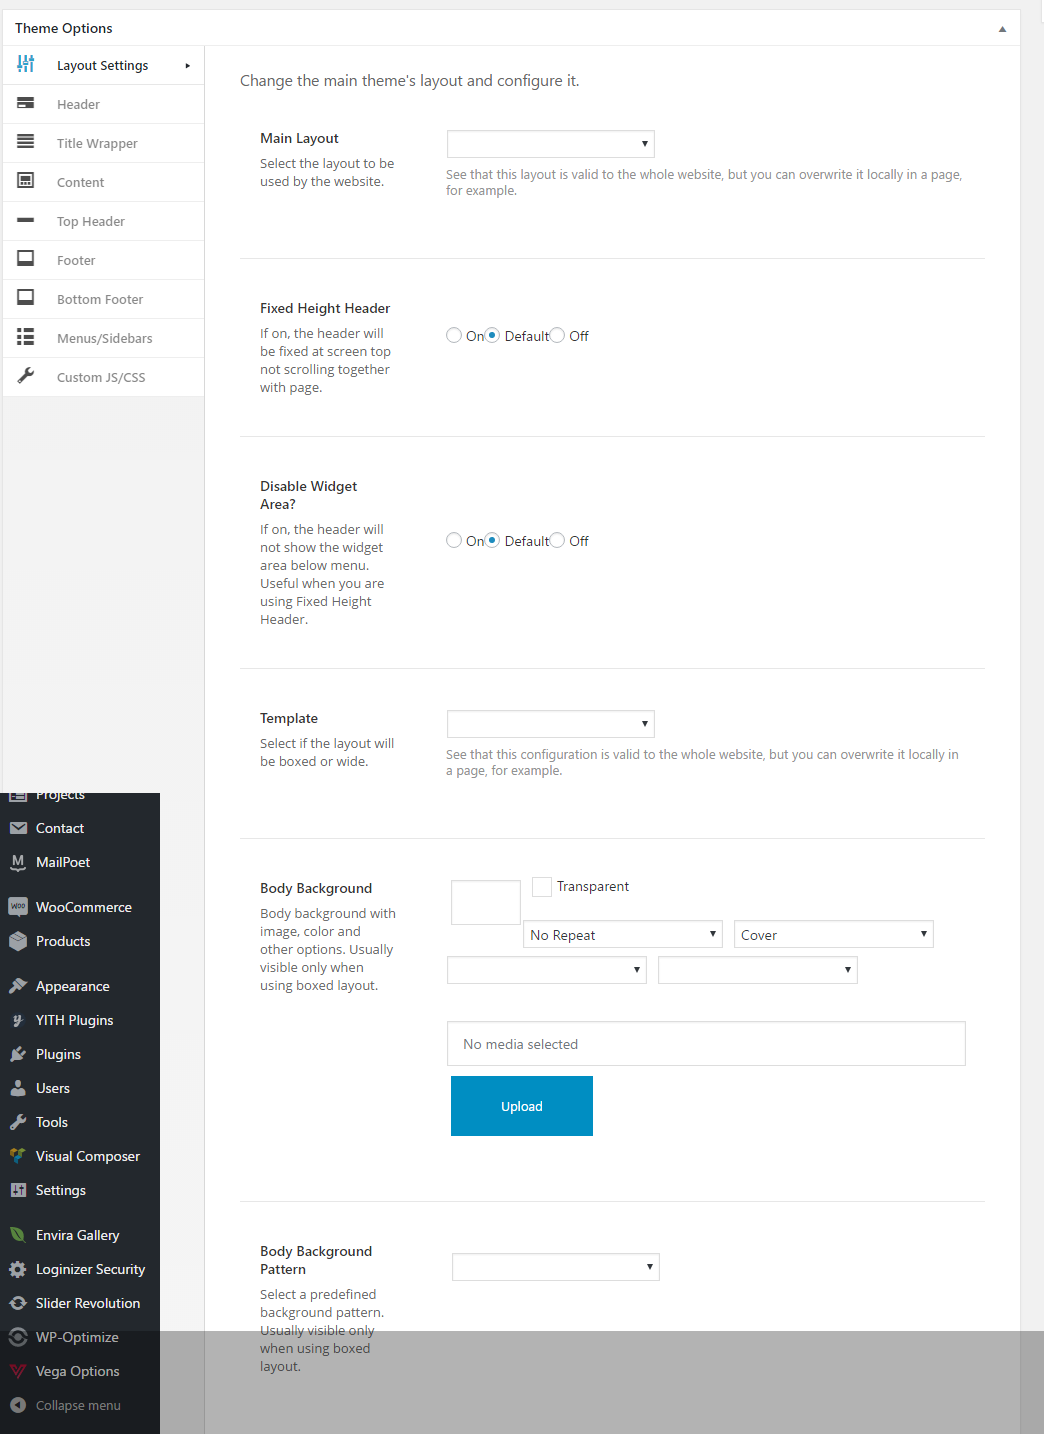
Layout Settings
Cygnus consist of fully featured page option, this section consists of page layout settings :
- Boxed Layout : Selected "On" on this option will enable box layout mode, "Default" will take settings from theme option panel.
- Main Layout : Choose main layout option as "1 Column", "2 Column Left", "2 Column Right" or "3 Columns".
- Main Content Container Background Color : Style main container background by playing with background color, uploading background image and so on.
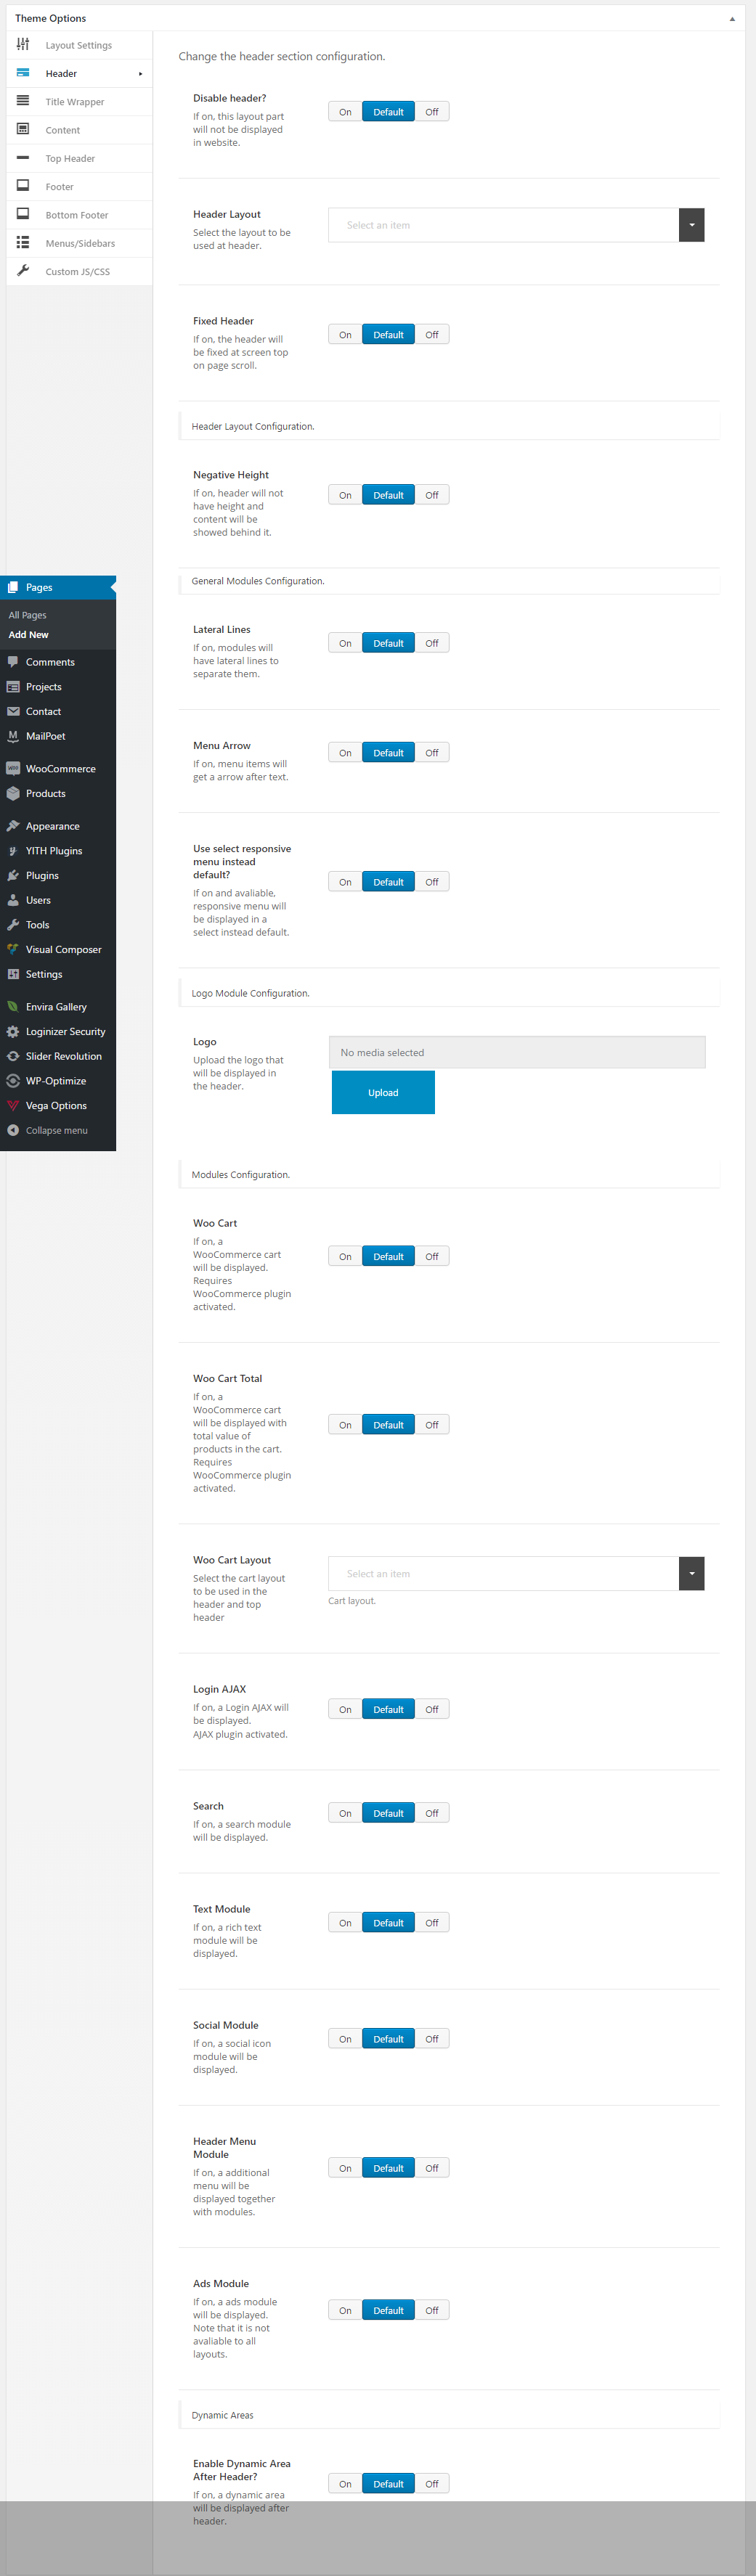
Header
Cygnus consist of fully featured page option, this section consists of page layout settings :
- Enable Header : Selected "On" on this option will show header , "Default" will take settings from theme option panel.
- Template : Choose header template as "Default", "Alternative", "Centered Logo", "Transparent", "Side", "Logo Only".
- Primary Menu : Choose menu for header, which is being created from Apperance > Menus.
- Sticky or Fixed : Choose header style as "Sticky" or "Fixed".
- Header Style : Choose header style background color.
- Menu Color : Choose menu color from dropdown.
- Menu Active Color : Choose menu active color from dropdown.
- Menu Dropdown Color : Choose menu dropdown color from dropdown.
- Menu Border Color : Choose menu border color from dropdown.
- Icons : Choose header icons color from dropdown.
- Logo : Upload logo for header using media uploader.
- Logo Retina : Upload logo for header using media uploader for retina devices.
- Logo (Light) : Upload light color logo for header using media uploader.
- Logo Retina (Retina) : Upload light color logo for header using media uploader for retina devices.
- Search : Selected "On" on this option will show search module on header , "Default" will take settings from theme option panel.
- Cart : Selected "On" on this option will show cart module on header , "Default" will take settings from theme option panel.
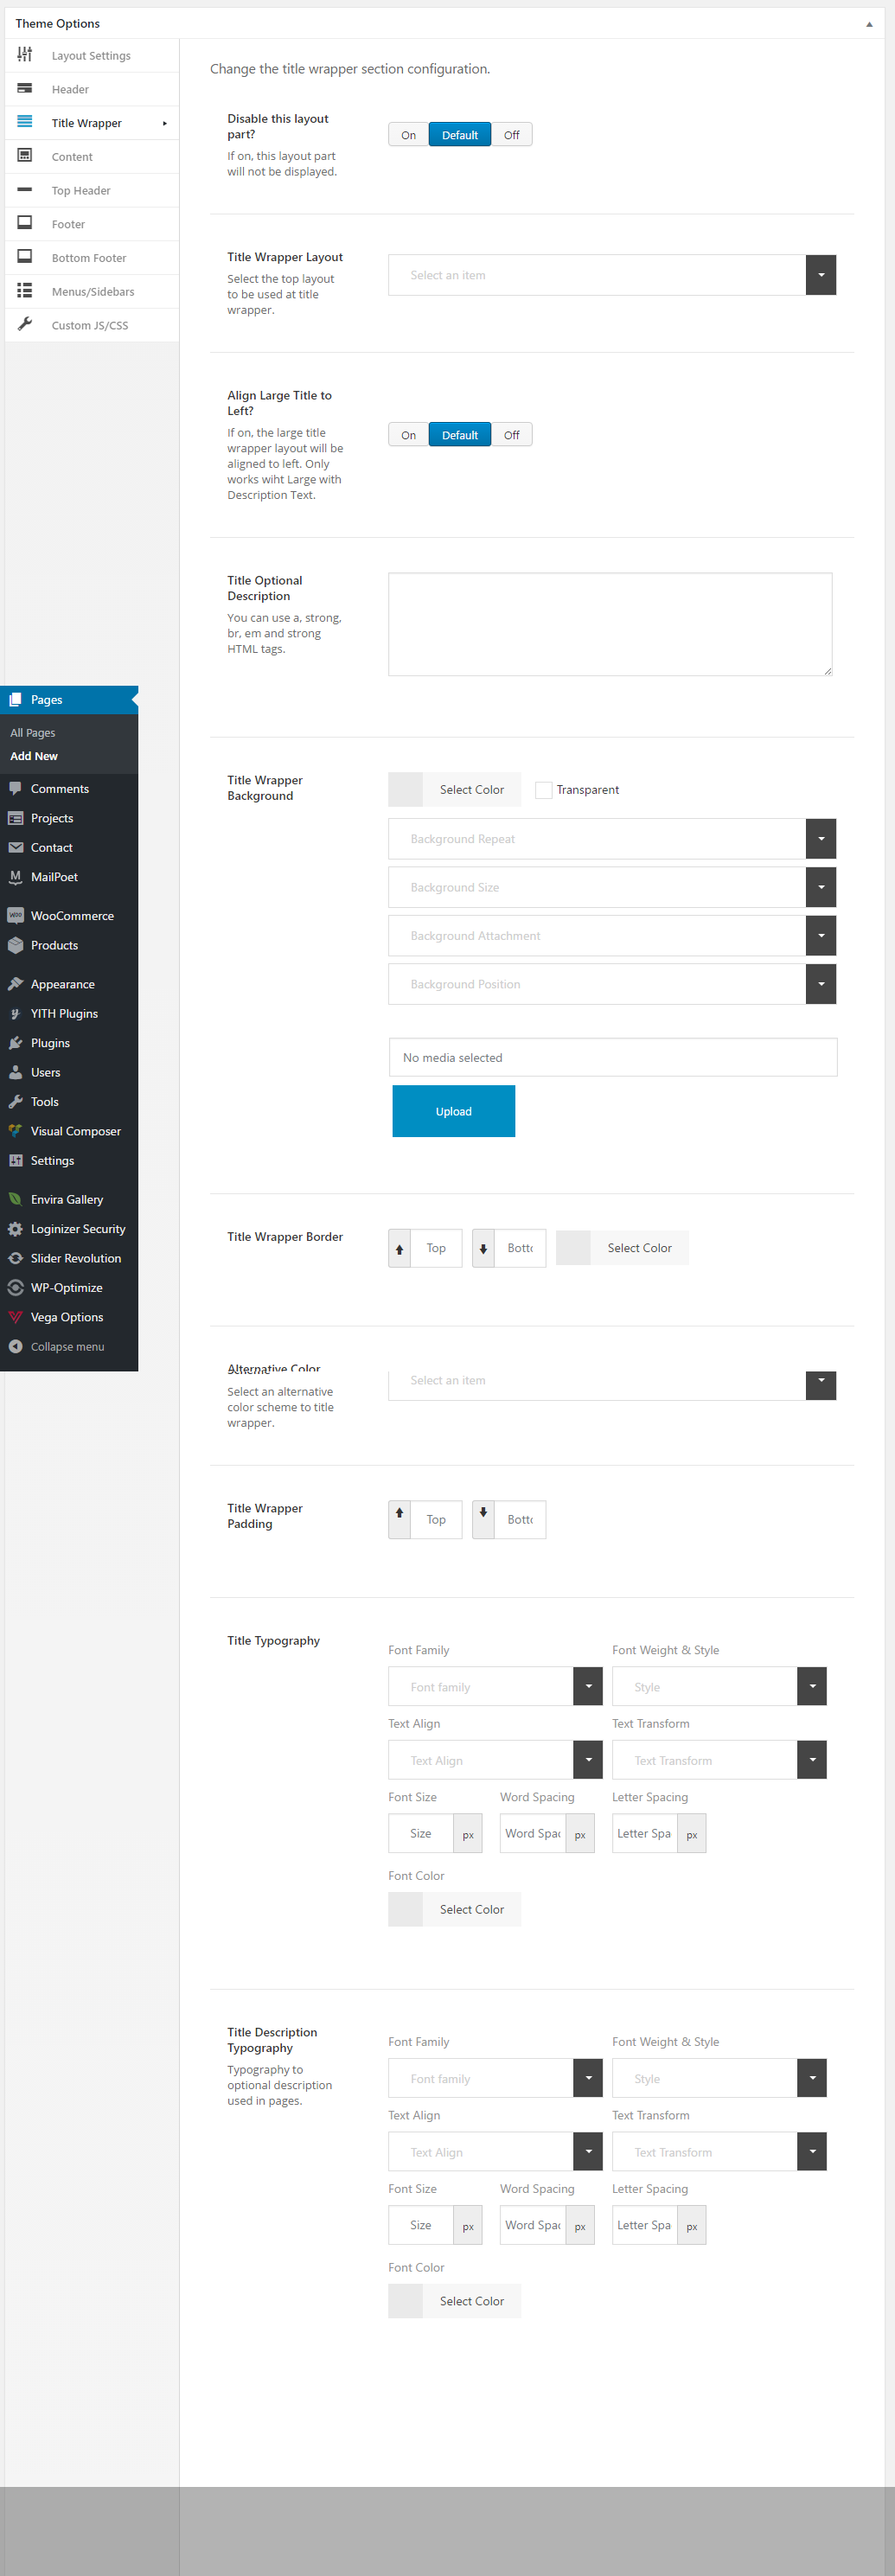
Title Wrapper
Cygnus consist of fully featured page option, this section consists of page layout settings :
- Enable Title Wrapper : Selected "On" on this option will show title wrapper , "Default" will take settings from theme option panel.
- Template : Choose template for title wrapper as "Default", "Bigger".
- Background Color : Choose background color for title wrapper from color picker.
- Align Center : Selected "On" on this option will show title and subtitle to center.
- Title Color : Choose color for title from color picker.
- Subtitle Color : Choose color for subtitle from color picker.
- Subtitle Text : Enter text for subtitle which will be displayed below the title.
- Subtitle Style : Choose subtitle style as "Normal", "Heading".
- Breadcrumbs : Selected "On" on this option will show breadcrumb inside title wrapper , "Default" will take settings from theme option panel.
- Breadcrumb Color : Choose color for breadcrumb from color picker.
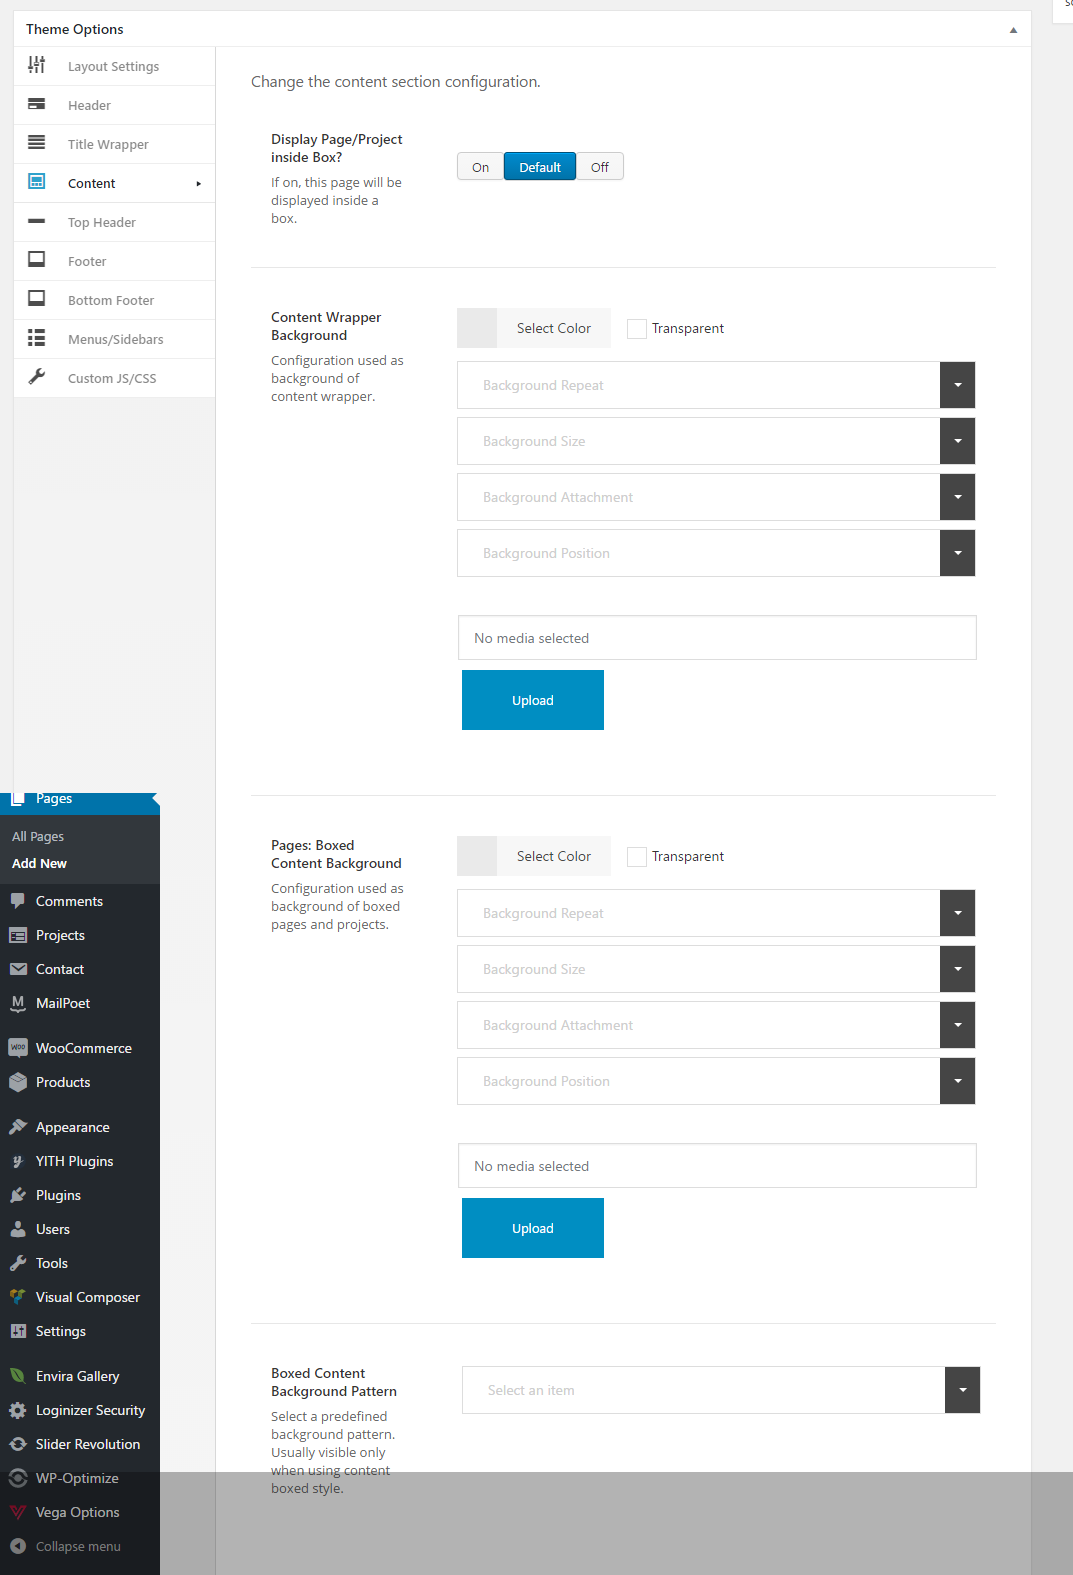
Content
Cygnus consist of fully featured page option, this section consists of page layout settings :
- Content Margin : Choose content margin for page as "Default", "No Margin", "Only Top Margin", "Only Bottom Margin".
- Template : Choose template for title wrapper as "Default", "Bigger".
- Enable Comments : Selected "On" on this option will show comments on the page.
- Enable Shadow Top : Selected "On" on this option will show top shadow.
- Enable Shadow Bottom : Selected "On" on this option will show bottom shadow.
- Show Special Content Above Top : Selected "On" on this option will show selected page content about the content.
- Show Special Content Before Page : Selected "On" on this option will show selected page content before page content.
- Show Special Content After Page : Selected "On" on this option will show selected page content after page content.
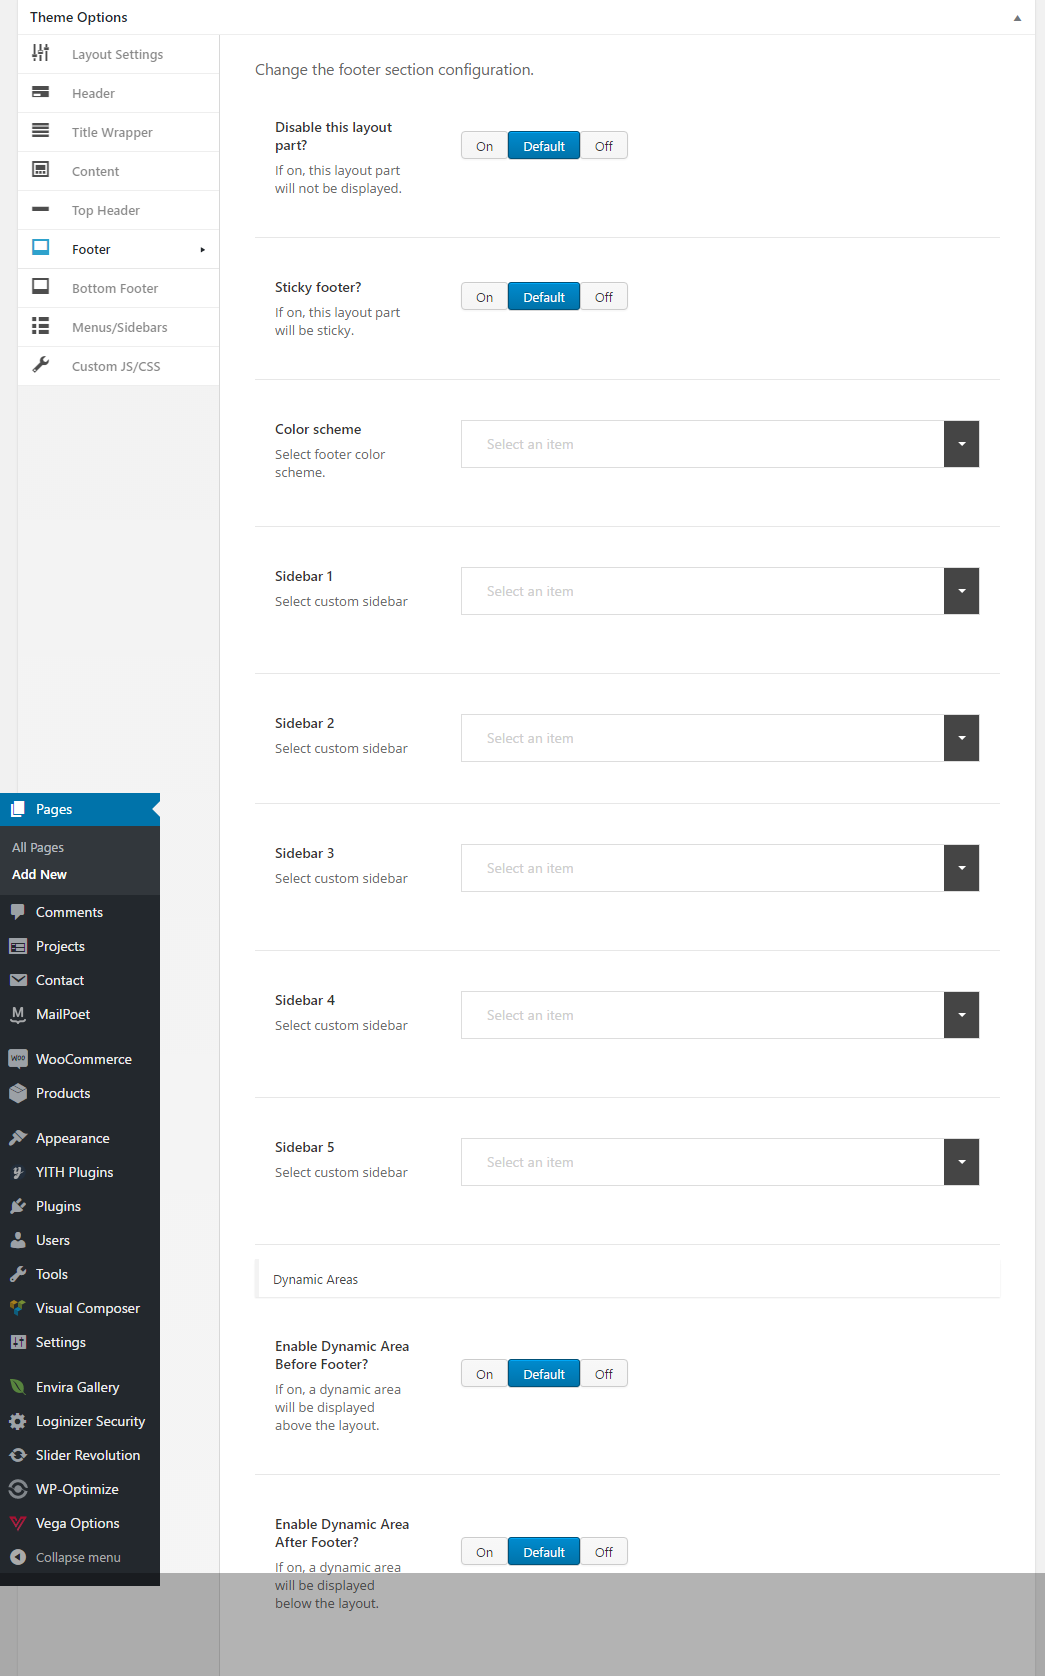
Footer
Cygnus consist of fully featured page option, this section consists of page layout settings :
- Enable Footer Sidebar ? : Selected "On" on this option will show widgets on footer , "Default" will take settings from theme option panel.
- Background Color : Choose background color for footer from color picker.
- Enable Footer : Selected "On" on this option will show footer , "Default" will take settings from theme option panel.
- Show Social Icons : Selected "On" on this option will show social icons on footer , "Default" will take settings from theme option panel.
- Copyright Content : Copyright area text for footer.
Theme Navigations
This Theme uses wordpress built-in menus feature which can be found in your wordpress dashboard > appearance > menus. In this section we will go by explaining every detail regarding usage of below tools as well as some other cool features we added such as maCygnus a mega menu and using 1500+ icons for your Menu items. We pointed sections with numbers and while explaining we may ask your attention to the screenshot for clear undrestanding.
From the 'Appearance' menu on the left-hand side of the Dashboard, select the 'Menus' option to bring up the Menu Editor and start implementing below steps.
- Click on create a new menu (Refer to No 2).
- You should define a name to your menu (eg: main menu, footer menu)
- Click the Create Menu button.
- Your new custom menu has now been defined and you are ready to drag and drop menu items.
Creating your menu
From the 'Appearance' menu on the left-hand side of the Dashboard, select the 'Menus' option to bring up the Menu Editor and start implementing below steps.
- Click on plus icon to add new menu (Refer to No 1).
- You should define a name to your menu (eg: main menu, footer menu)
- Click the Create Menu button.
- Your new custom menu has now been defined and you are ready to drag and drop menu items.
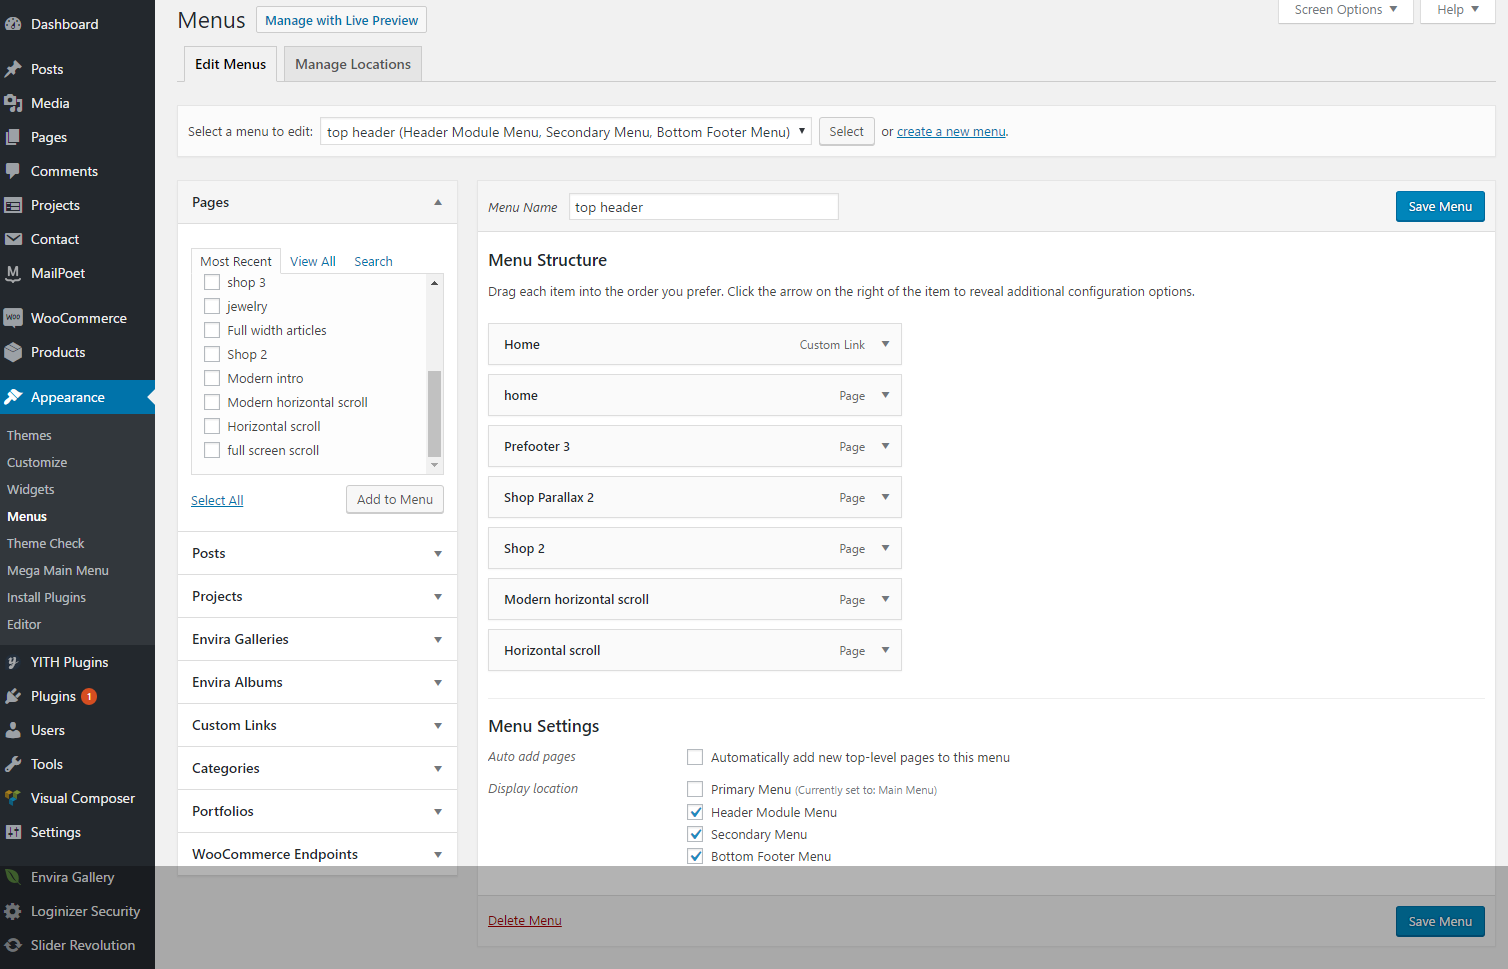
Adding Items to a Menu
- The Screen Options allow you to choose which items you can use to add to a menu. Certain items, like Posts are hidden by default. If you have'nt spot it yet, its on wordpress backend header right-side. if you click on "Screen Options" it will slide down. so you can easily check items to hide or show.
- Refer to No 3. These panes will alow you to drop any sort of item to your menu. for example No 2 will let you to add paegs, the rest are your custom links, posts, categories and so on.
- The general technic of these panes are pretty simple, select the item and click on "Add to Menu" button. after a moment you will see the item appeared on your menu white space.
- Please remember you should always save your changes by clicCygnus on "Save Menu" which can be found on header and footer right section.
Deleting a Menu Item
- Locate the menu item that you want to remove in the menu editor window
- Click on the arrow icon in the top right-hand corner of the menu item/box to expand it.
- Click on the Remove link. The menu item/box will be immediately removed.
- Click the Save Menu button to save your changes.
Customising Menu Items
- Locate the menu item that you want to customise in the menu editor window
- click on arrow icon in the top right-hand and exapnd.
- The Navigation Label: This field specifies the title of the item on your custom menu. This is what your visitors will see when they visit your site/blog.
- The Title Attribute This field specifies the Alternative ('Alt') text for the menu item. This text will be displayed when a user's mouse hovers over a menu item.
Creating Multi-level Menus
When planning the structure of your menu, it helps to think of each menu item as a heading in a formal report document. In a formal report, main section headings (Level 1 headings) are the nearest to the left of the page; sub-section headings (Level 2 headings) are indented slightly further to the right; any other subordinate headings (Level 3, 4, etc) within the same section are indented even further to the right.
The WordPress menu editor allows you to create multi-level menus using a simple 'drag and drop' interface. Drag menu items up or down to change their order of appearance in the menu. Drag menu items left or right in order to create sub-levels within your menu.
To make one menu item a subordinate of another, you need to position the 'child' underneath its 'parent' and then drag it slightly to the right.
- Position the mouse over the 'child' menu item.
- Whilst holding the left mouse button, drag it to the right.
- Release the mouse button.
- Repeat these steps for each sub-menu item.
- Click the Save Menu button in the Menu Editor to save your changes.
Adding Your Menu to Your Site
Please refer to No 7 in screenshot. Cygnus supports 4 theme locations. if you have created your navigations, in order to display them in front-end you should assign your menus to specified locations accordingly.
- Primary Menu : Will act as your main navigation.
- Primary Left Menu : If you choose header style 3 this menu will show on left side of your logo.
- Primary Right Menu : If you choose header style 3 this menu will show on right side of your logo.
- Footer Menu : Will appear on footer.
- Shop Menu : Will appear on shop page.
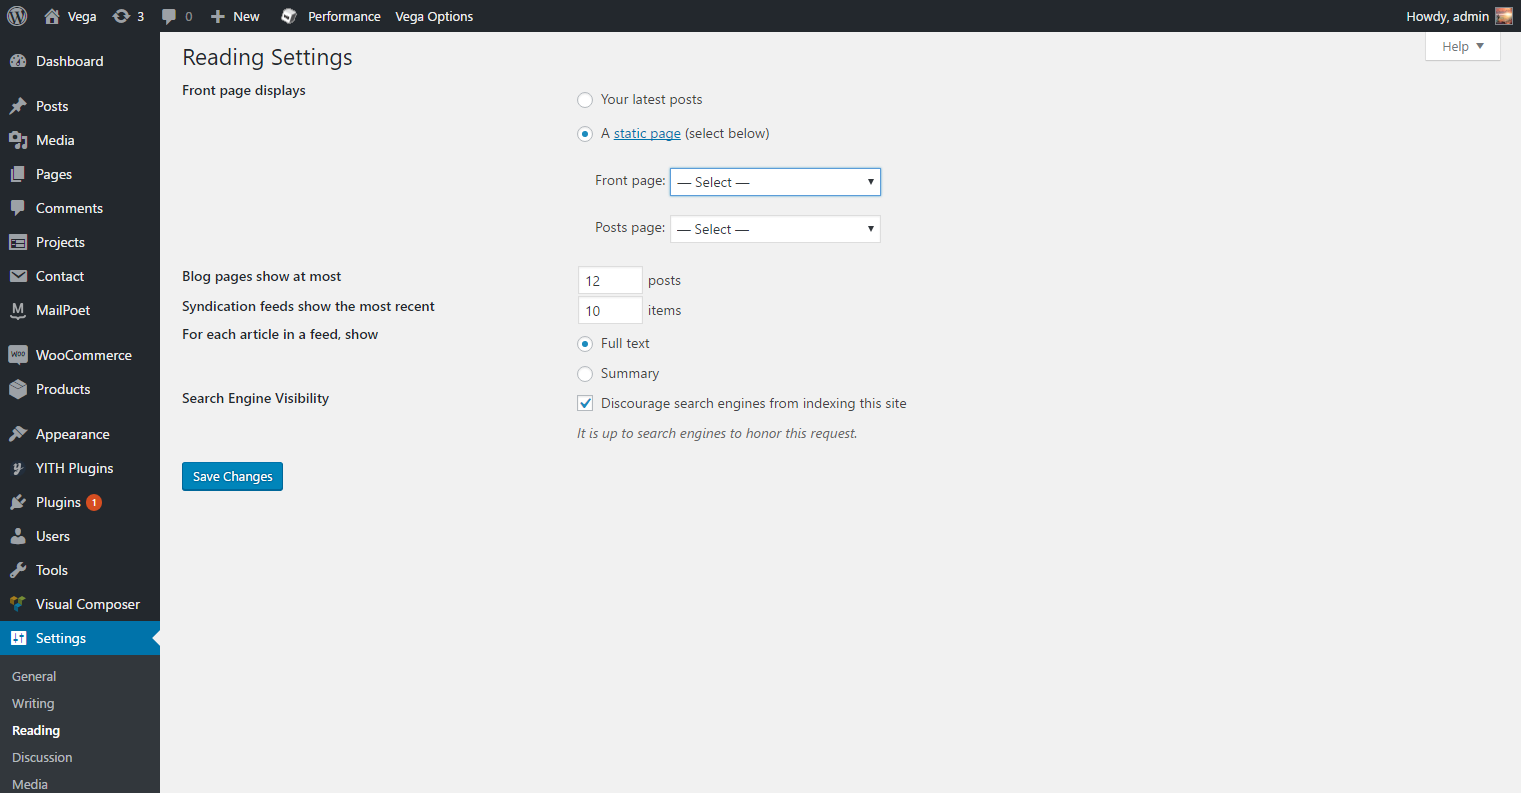
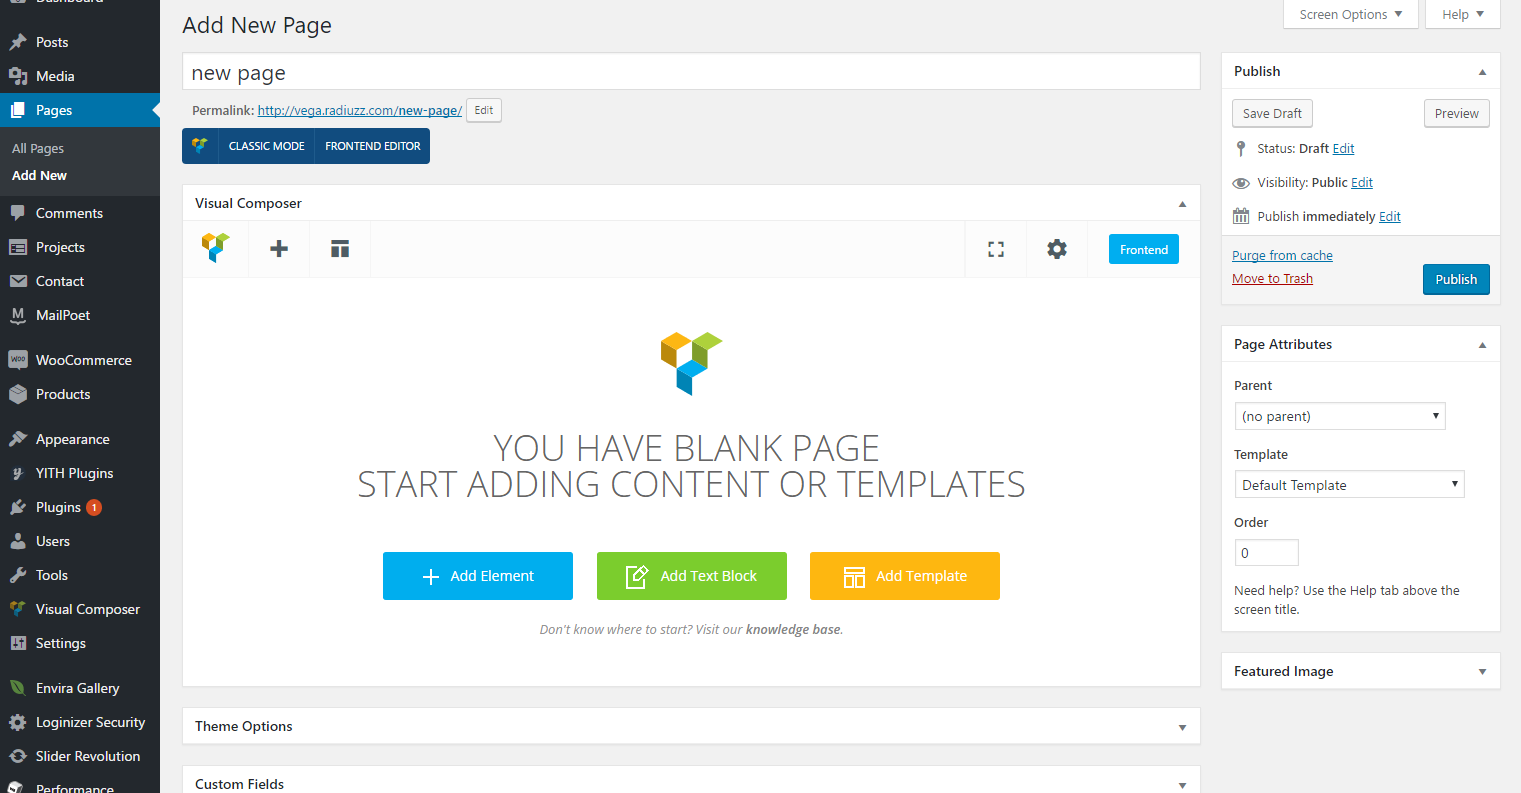
Set up Homepage
In Cygnus setting up your homepage is pretty simple thing. all you need to do below steps :
- Add New Page
- Build your homepage content same like building other pages.
- you may consider checCygnus its page options, for example : page layout, slideshows, Backgrounds.
- Save the page.
- From Wordpress Left Hand sidebar navigate to Settings > Reading.
- You will see a page like below.
- Change your Front page displays to "A static page (select below)"
- From "Front page:" selectbox choose the page you just created
- Save Settings and you should see that page in your homepage.
Blog
In below Screenshots we have explained how to make blog posts and blog loops. in Cygnus you can have unlimited Blog pages with 3 different styles.
- From Wordpress Admin Left hand Sidebar > Blog > Add New Post
- As you can see in below screenshots you should follow below steps to create a new post
- Cygnus has 9 post type : Image, Video, Sound, Portfolio, Link, Status, Standard, Quote, Aside.
- Once you done with creating new posts procceed to add a new page.
- Click on Page Composer Button to switch to visual mode.
- then save the page
- However you can modify its settings such as its style and so on right from the module editor section
- as shown in below screenshot click edit. you will see the Blog Edit options.
- Once you done editing click save.
- Now you can view the page to see your blog loop.
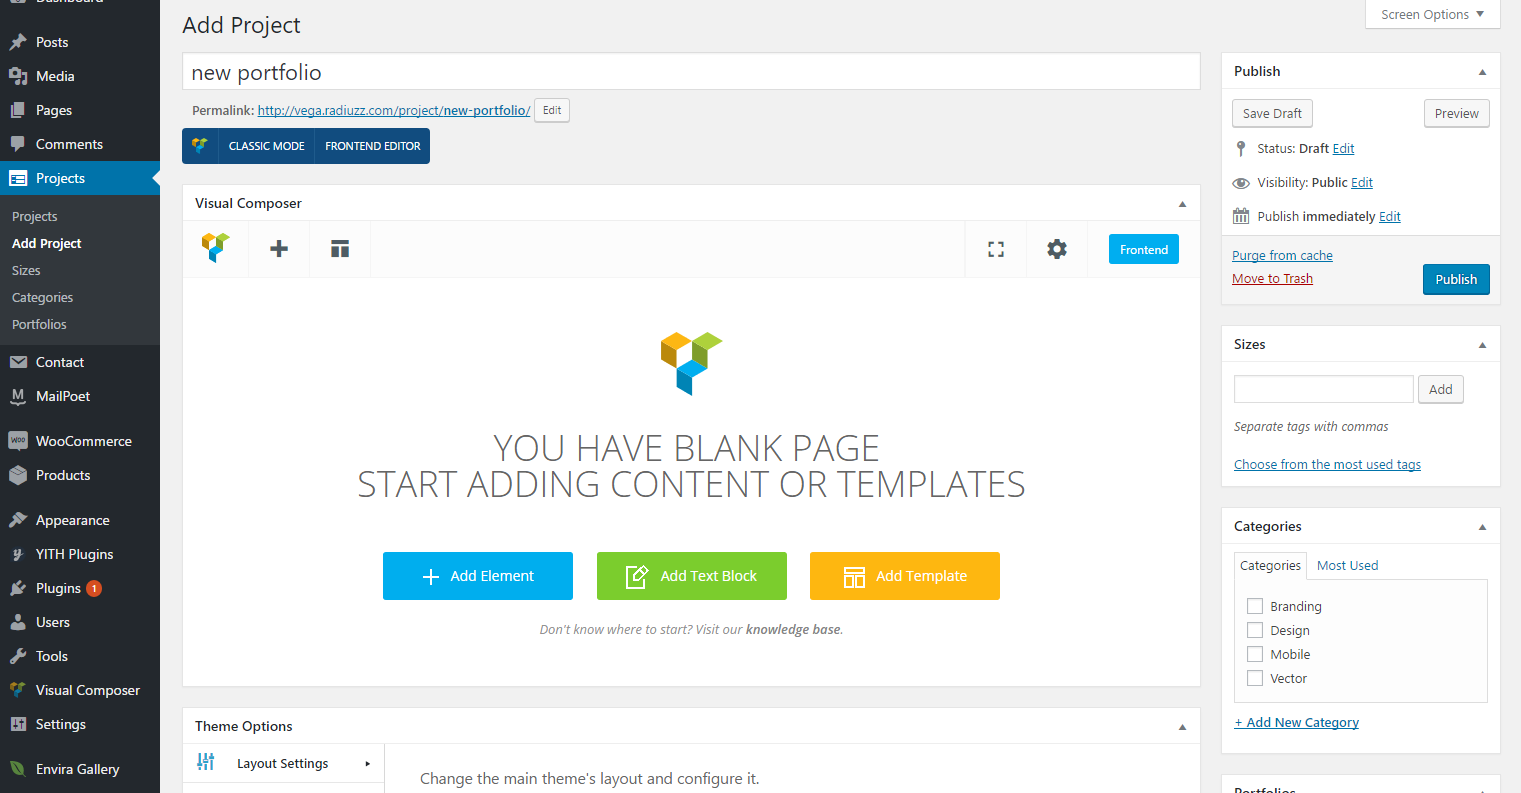
Portfolio
Portfolio is a custom post type and you can exhibit your work using this feature. Its basic functionality is the same as creating a new post or page. In order to add a portfolio loop page you should follow below steps :
- Add a new page.
- Add Page name "Portfolio".
- Click on "Add Element" refer to (2).
- On clicking popup will appear "search for gallery" and add gallery shortcode.
- then save the page
Page Composer
Page Composer is a visual shortcode generator that you can build your layout painlessly without wasting your time with writing shortcodes. We built Page Composer based on Famous plugin called Visual Composer.There's one concept/design pattern you should know. In the Page Composer editor mode you'll have "Add element" button, which you should click or drag to the worCygnus canvas, to add content block or row to your page. ClicCygnus the "Add element" button will show the content element selection menu. Content blocks are divided into categories so you can filter. Alternatively you can type the shortcode name to filter down the items instead of search them visually.
Main buttons :
- The button to switch between classic and visual mode. So you can modify generated shortcodes manually if you know what you are doing.
- Frontend Editor: The button to switch to frontend mode, which means you can modify or add shortcode directly on browser.
- Adds Elements, using this button you can drop all shortcodes avalaible in Cygnus. You can drag this button and drop to a page section, row or a column.
- Templates : You can save a page using this section and use it in other page. Its handy when you built blocks and columns that you might need them later in other pages.
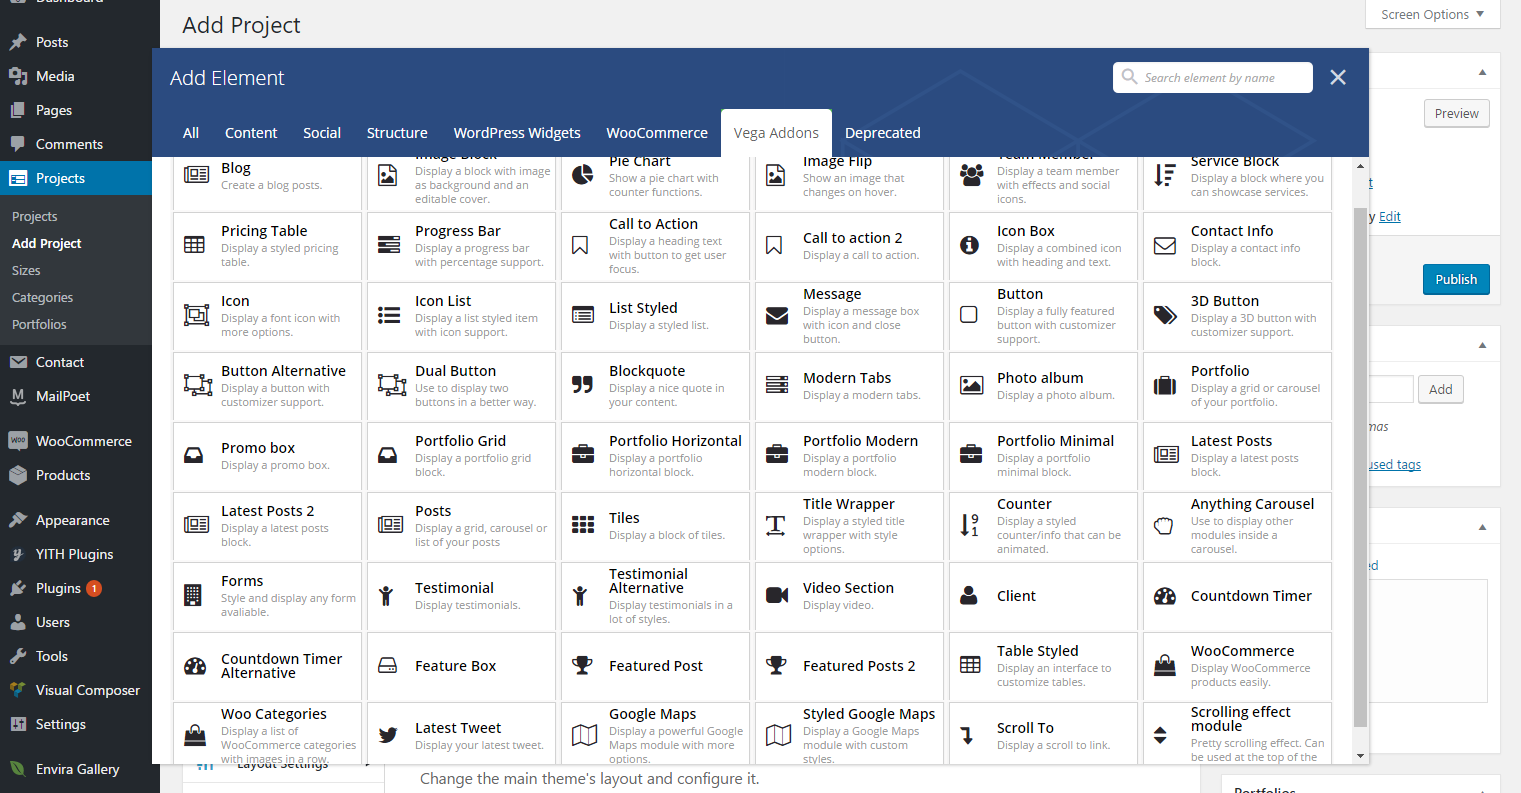
Elements Blocks
Below image shows the list of all shortcodes that you can use in Cygnus. You can use category filter and search element name field to find your shortcode much quickly.
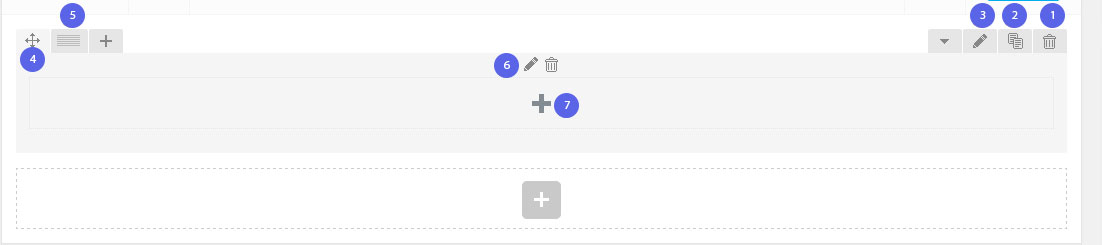
Rows
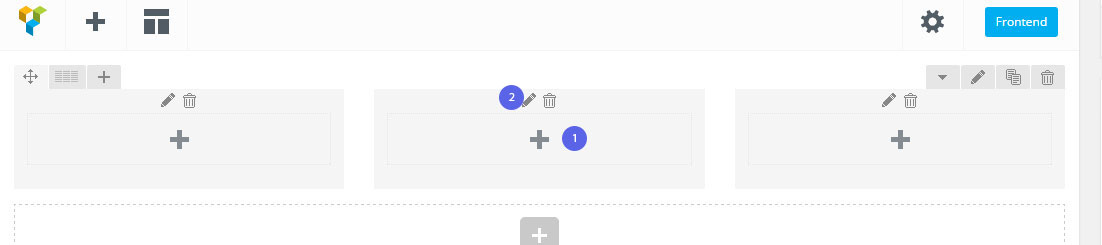
Rows are used to divide your page into the logic blocks with columns, columns later will hold your content blocks. Rows can be divided into the layouts (eg. 1/2 + 1/2, 1/3 + 1/3 + 1/3, and so on). Your page can have unlimited number of rows. To change row's position, click and drag row's drag handler (top left row's corner) and drag row around (vertical axis). Please note that you can edit a row property to enable full width option.
Introducing Row based on below screenshot :
- Delete button to delete the row and the all elements inside it.
- Clone Button to dublicate the row and all its columns and elements
- Edit button to give it custom class name and enable fullwidth mode.
- Dragger button to move vertical wise.
- Layout section to divide the row into differnt column width combinations.
- Column Edit button inside this row
- Plus button will bring up all elements pop up in order for you to choose which element to drop into this column.
Columns
Columns are part of the row and they hold your content elements inside them. Columns can be reordered. Click and drag column around (horizontal axis). That way you can group elements in logical groups and then drag them around with your mouse (to re-position).
Page Section
Page sections are standalone shortcode that plays a fullwidth container role. It has huge optionality so you can put your shortcodes into it. You can have numerious shortcode to add, an many more using this huge shortcode. page section same as Rows are column holders, so you can have first level and second level columns to build complex layouts which has been never possible in old times without HTML and CSS knowledge.
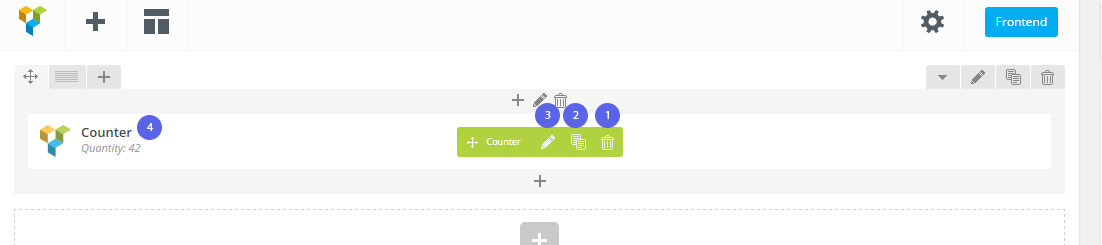
Content Elements
This is a list of available content elements that can be placed inside of the columns. Think of them as bricks. With those bricks you are building your layout. Most of the content elements have options, to set them click pencil icon. To save changes click save button.
- Delete Button to delete the shortcode
- Clone button
- Edit button to view all of this shortcode options
- Shortcode Name
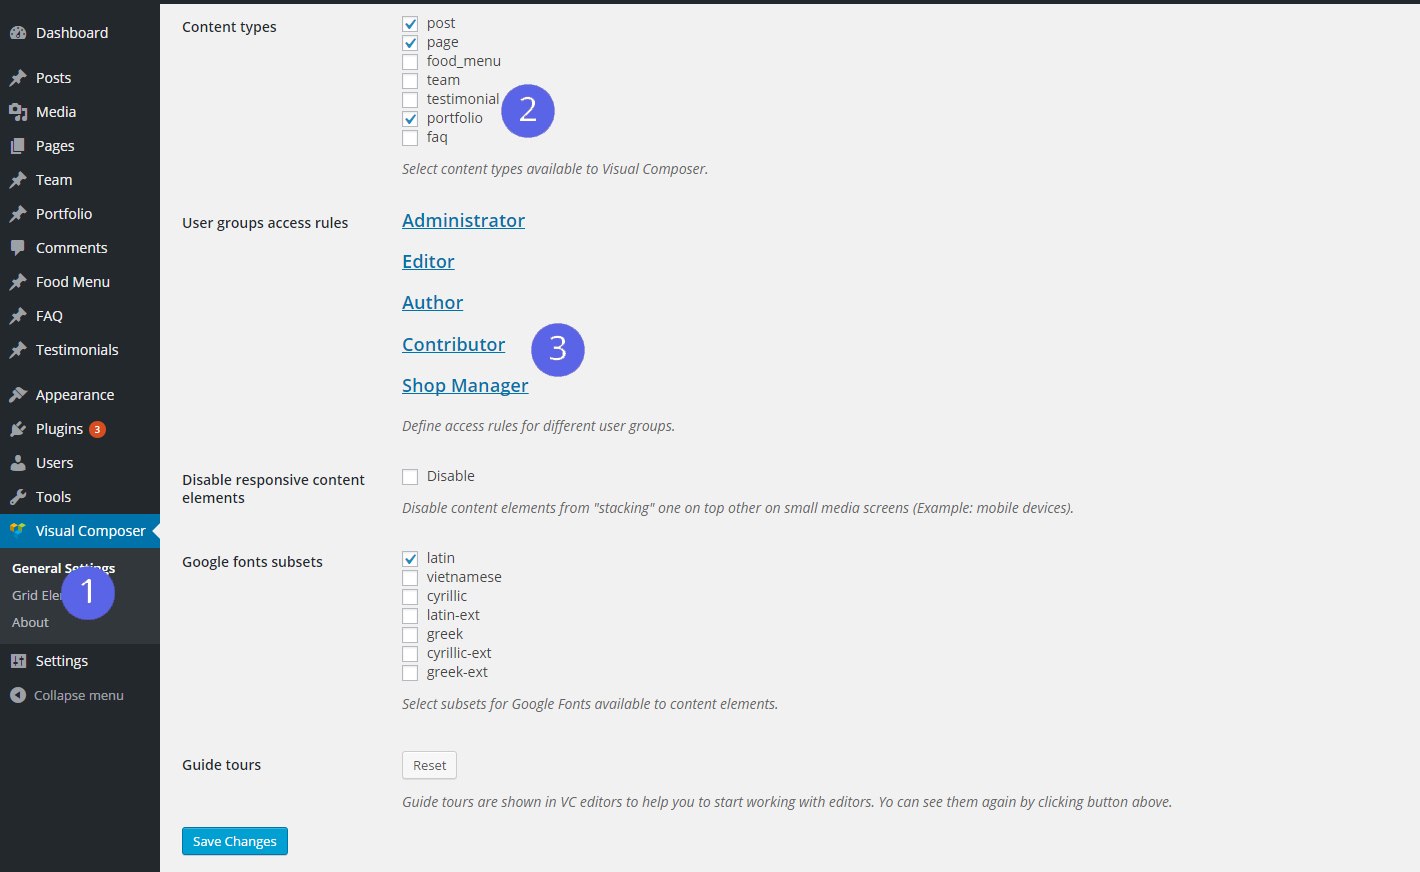
Page Composer Settings
You can control page composer global settings such as disable/enable in a post type and user roles that can use a shortcode. You can find these settings from WordPress dashboard => left sidebar => settings => Page Composer. Once you arrived to this page, you will face with 2 options :
- Content types:
This option allows you to choose which post type should have the page composer feature. Please note that only post types will have this feature that they have WP editor feature. so for example clients will not have page composer even if you check mark its post type.
- Rules for users groups:
This option will give you the ability to select which shortcode should be appeared in the specific user role. this is useful when you give subscribers the ability to post, so you can disable some shortcodes for them.
Woocommerce
One of great features of Cygnus is that you can make an online shop with it.
Cygnus is fully compatible with latest version of Woocommerce Plugin. We added required stylings to fit the design, Checkout section in header toolbar, and all required confiq codes to make it seamless with Cygnus. If you dont need Woocommerce simply dont install it and all the features, codes and anything required for woocommerce will not be loaded and interfered. Vice versa, if you need to set up woocommerce just install woocommerce like you do for other plugins and thats all about it. you dont need to do anything else. There are couple of options in Masterkey Settings > Advacned > Woocommerce and a predefined widget area for shop archive template that you will need to consider using them.
Woocommerce Documentation
Please be informed that we do not give support to any third party plugin's questions and issues. We can only afford to answer simple usage questions or issues related to incompatibility with the theme. this exception is for only our supported Plugins (Layerslider, Revolution slider, Contact form 7 and Woocommerce).
Contact Form 7
Good News for those of you who is familiar with great plugin Contact form 7 : We have covered all styling required to build your forms without worrying about its appearance. You dont need to do anything in extra just intall Contact Form 7 and Cygnus will take over the rest. we will dequeue its styling and add our own customised version to make it work seamlessly with Cygnus.
If you are not familiair with this plugin check out below resources: Contact Form 7 Plugin page Contact Form 7 Documentation
Please be informed that we do not give support to any third party plugin's questions and issues. We can only afford to answer simple usage questions or issues related to incompatibility with the theme. this exception is for only our supported Plugins (Layerslider, Revolution slider, Contact form 7 and Woocommerce).
Tips and Tricks
Cygnus Comes with a powerful backend that allows for a heavy style and customization, But often times this is not enough for some users and they want to modify and add their css rules. In this case we highly recommend you to use child theme. It will give you the power to modify theme in any manner you like without missing any of our theme updates. how to make a child theme? There are many tutorials and if you google will sure find many of them useful. There are some occasions you need our help to find the best way to change an specific css rule, for sure we will help you in our help desk to get the right snippet code.
However I recommend you to use some Inspect element to find the exact class selector with its rules and try to recoding to fit your needs.
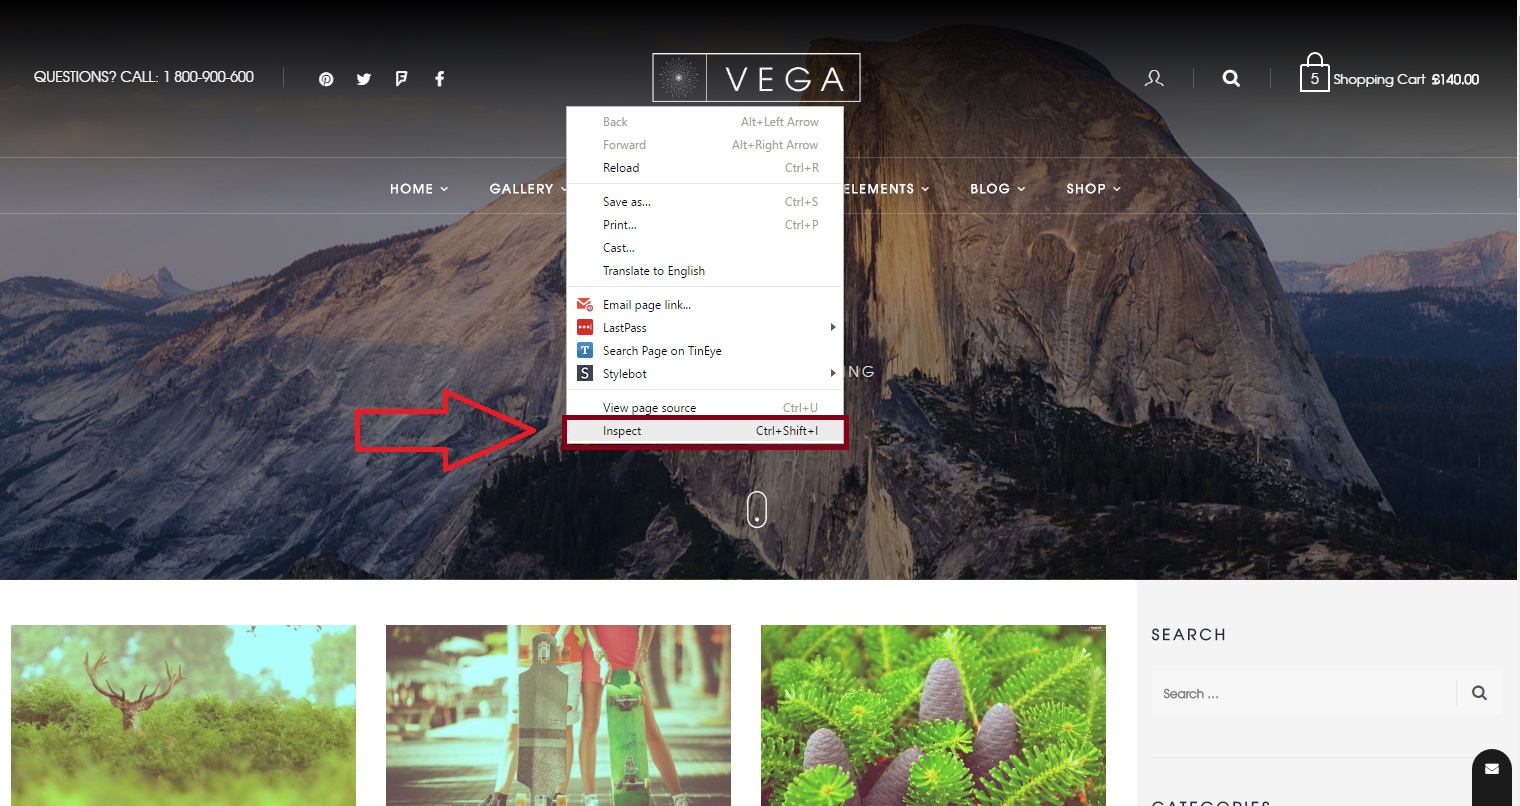
What is Inspect Element?
All Browsers has a handy tool that if you right-click on window you will see it. please see below screenshot
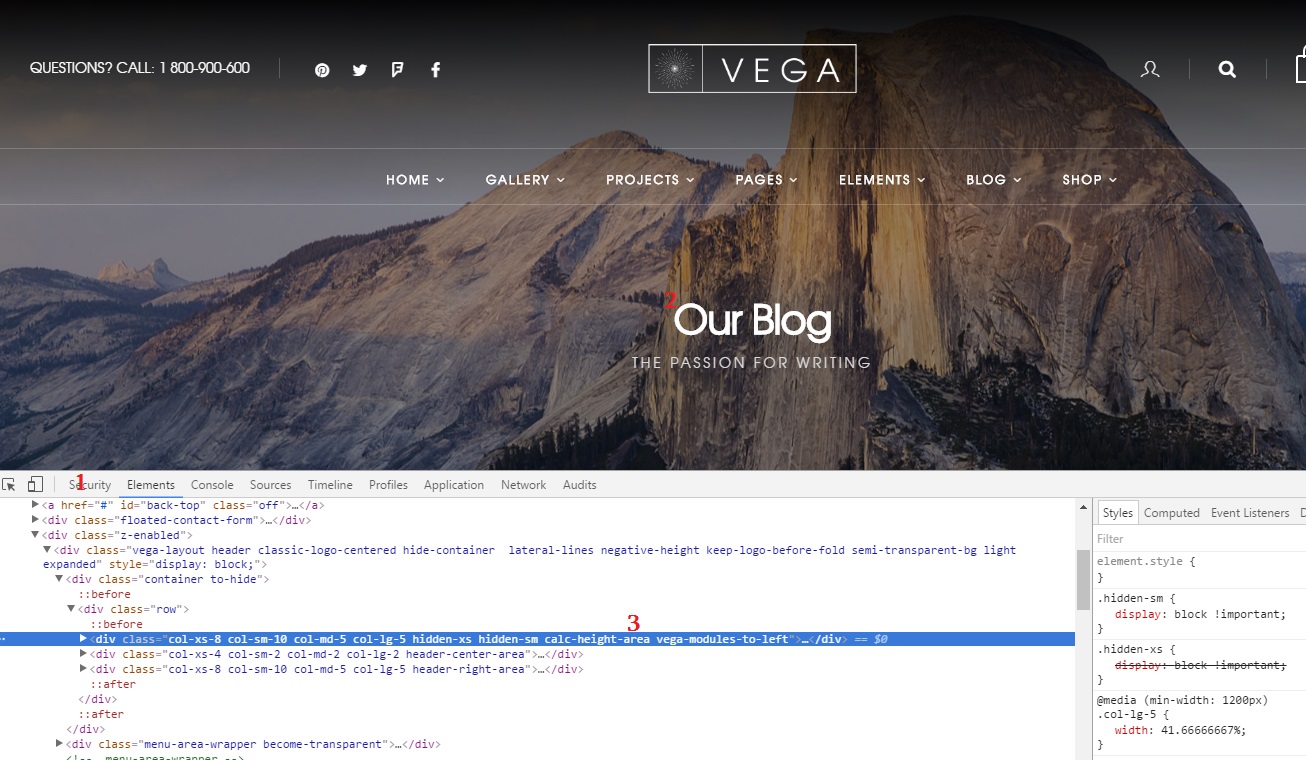
So what is next?
once you activate "Inspect Element" in your browser you will see a panel like below. matching with numbers (in screenshot) follow below steps :
- Click on zoom icon to activate click to inspect feature.
- Now you can click on the element you need to alter its CSS rules.
- Once you clicked you will see its HTML content in the left panel like below, so you will make sure you have inpected the right element (based on the selector name)
- On the right Hand you should see the Class selecor name as well as its rules like below.
So what should I do to override the rules?
You have 2 main approches :
- If there are just few modifications then use our custom css option. you can read about it in "Custom CSS" section in this documentation.
- If you decided to go beyund simple changes then we highly recommend to use a child theme.
Translating WordPress Theme
Cygnus is localised and you can easily translate it to any language you like. Please note that you font family you are using in theme should support the language's special characters. so you will need to use a fontface that supports it.
Configure WordPress
Before translating your theme, you’ll need to make sure WordPress is setup correctly with your locale. Open wp-config.php from your wordpress installation root folder and modify the line below, or add it if it is missing. Complete lists of codes can be found at (country codes) and (language codes).
For example you will need to modify as below for Portuguese Language.
define ('WPLANG', 'pt_BR');
Installing a Plugin
Now you’re ready to translate your theme. The easiest way to do this is by installing the Codestyling Localization plugin. Install and activate the plugin and go to Tools => Localization (shown in your language). Read Plugin documentation on how to use it to translate the theme. Cygnus's Textdomain is "Cygnus".
Handling Theme Updates
If you update your theme to a new version which has an updated language file, you’ll need to rescan your theme using the plugin and then translate the new strings. Find your theme in Codestyling Localization plugin and click the Rescan link to have the plugin update the pot file.
After you have rescanned your theme, click Edit to translate any new strings the plugin found when rescanning. Remember to generate a new MO file after you have translated your new strings.
My Contact Form not working!
If you have used contact form shortcode or widget, set up the correct email address (to be sent) and you do not recieve any emails after all your attempts then read on about some tips that may help.
Try getting the Wordpress wp_mail function to work properly
WordPress sends email using wp_mail, a function that for all practical purposes operates like php’s mail. It is a way for your site to send email via a PHP script rather than other ways like SMTP.
In order to determine what your problems might be, it is important to understand the potential email configuration requirements. Some issues could be server-based, others could be not understanding restrictions by your host.
In some cases even mail() function is disabled by default and you should set it to "ON" from php configuration file (php.ini) or ask hsoting provider to enable it for you.
Valid email headers
Some hosts require that any server-side email script send with a “from” address that is an actual email address. WordPress by default sends email from a generic address “[email protected]”. If your host has a requirement that you send from a valid email address and you don’t have a [email protected] email configured, then your site can’t send email. for example [email protected] should be configured in your mail server in order to pass through this policy
Are you on a shared server?
In general, on shared hosting, the email process is shared, too. If another user on your host has a script that is tying up the email server, that is going to effect your site (and therefore your email script).
For those running WordPress on shared hosts, the issue most often is that email is delayed in some case for a long period. But it is important to know if this is something you are likely to be effected by.
What about spam filters?
Sometimes, the issue is that certain messages are simply blocked because of an addressing issue. Emails coming into one of the major email provider domains (hotmail, aol, gmail, yahoo) can get flagged for a number of reasons.
If email from wp_mail is not getting delivered, you may need to consider is it not getting through to everyone? Or is this limited to certain domains? Getting blocked or blacklisted by a specific host could be an issue.
What is the best way to avoid script base mailing system?
The simplest way around all of this is to use a valid email account sent through an SMTP server. SMTP stands for Simple Mail Transfer Protocol and sending through an SMTP server simply means you have set up a real email address on your system and you are allowing the web based script (wp_mail) to connect to the server with appropriate account credentials. This will satisfy most hosting requirements and also help you avoid system bottlenecks on shared hosting.
There are many plugins that forces wp_mail function use an SMTP for delivering emails. We suggest below solutions :
Using one of these plugins is an easy way to change your WordPress email configuration to send email via SMTP. That is a more reliable and more stable way of sending email through WordPress.
The only thing you should do is to:
- Specify the from name and email address for outgoing email. (for example : [email protected])
- Specify an SMTP host (eg. gmail : smtp.gmail.com)
- Specify port (eg. gmail : 465)
- Choose SSL / TLS encryption (eg. gmail : SSL)
- Choose to use SMTP authentication or not (eg. gmail : yes, Use SMTP authentication.)
- Specify an SMTP username and password (eg. [email protected], your email password)